LLM Robotics Demo#
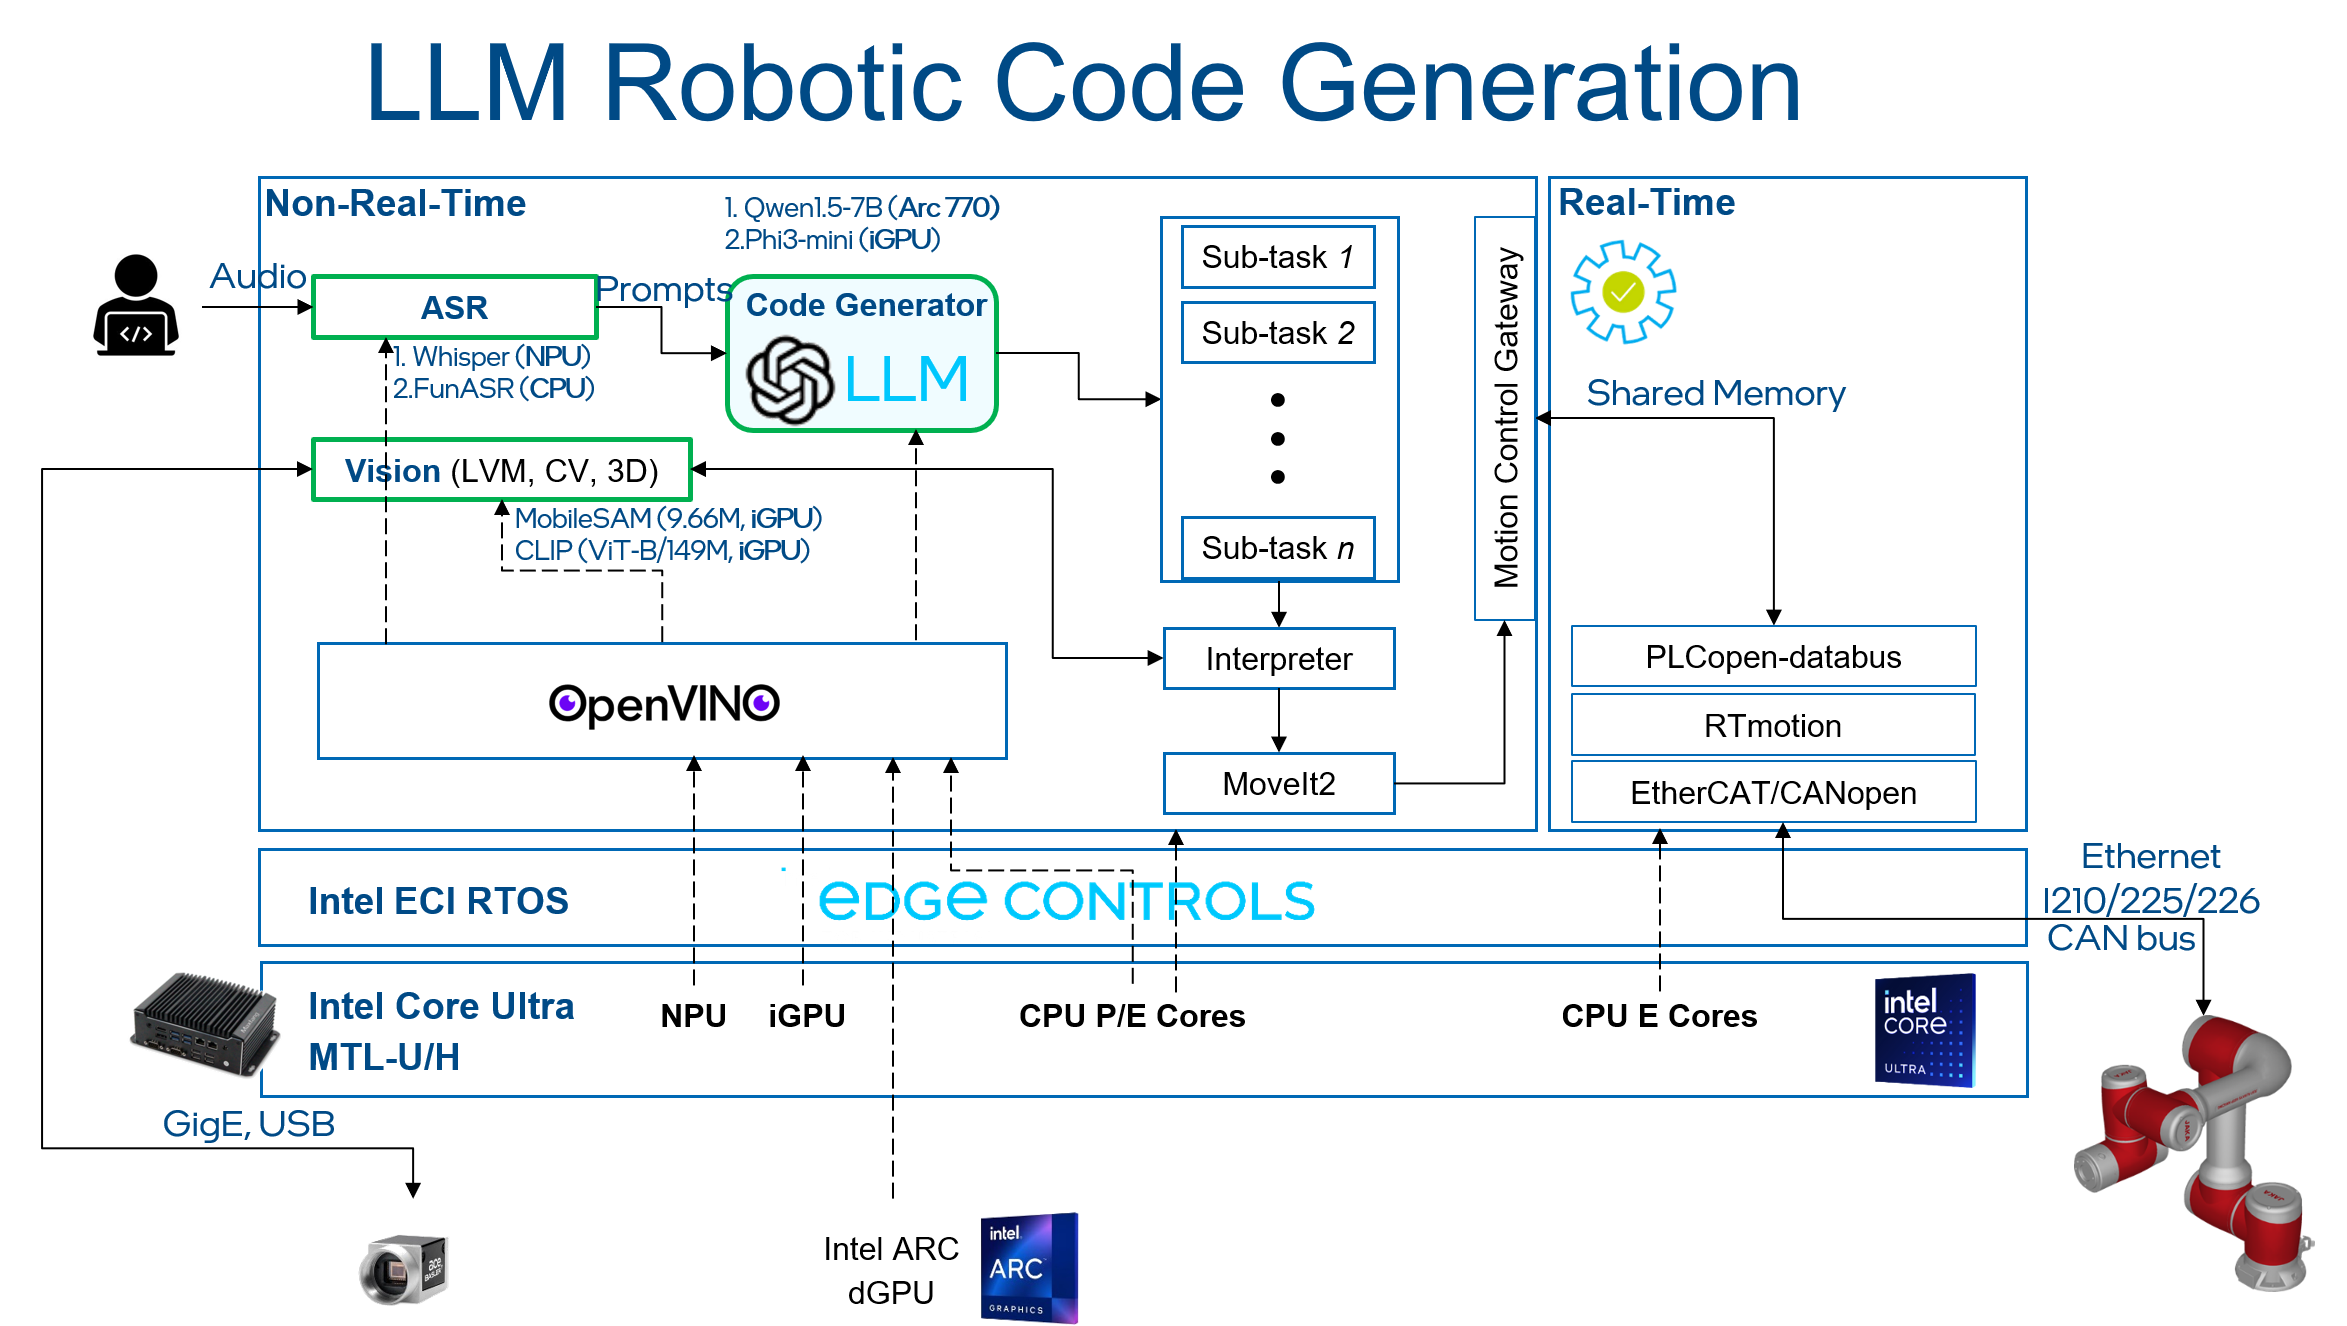
This Reference Implementation will provide a step-by-step guide to setup a real-time system to control a JAKA robot arm with movement commands generated using an LLM. Below picture is the architecture of demo:
Real Time Linux Setup#
This section will provide a step-by-step guide to setup a real-time capable system using a preemptible real-time Linux kernel, kernel boot parameters, and iGPU driver.
Prerequisites#
Specification |
Recommended |
|---|---|
Processor |
Intel® Core™ Ultra 7 Processor 165H |
Storage |
256G |
Memory |
LPDDR5, 5600 MHz, 16G x 2 |
Operating System |
Canonical® Ubuntu® 22.04 (Jammy Jellyfish) (link) |
Setup Package Repository#
![]()
![]()
Setup the ECI APT repository:
Download the ECI APT key to the system keyring:
$ sudo -E wget -O- https://eci.intel.com/repos/gpg-keys/GPG-PUB-KEY-INTEL-ECI.gpg | sudo tee /usr/share/keyrings/eci-archive-keyring.gpg > /dev/null
Add the signed entry to APT sources and configure the APT client to use the ECI APT repository:
$ echo "deb [signed-by=/usr/share/keyrings/eci-archive-keyring.gpg] https://eci.intel.com/repos/$(source /etc/os-release && echo $VERSION_CODENAME) isar main" | sudo tee /etc/apt/sources.list.d/eci.list
$ echo "deb-src [signed-by=/usr/share/keyrings/eci-archive-keyring.gpg] https://eci.intel.com/repos/$(source /etc/os-release && echo $VERSION_CODENAME) isar main" | sudo tee -a /etc/apt/sources.list.d/eci.list
Configure the ECI APT repository to have higher priority over other repositories:
$ sudo bash -c 'echo -e "Package: *\nPin: origin eci.intel.com\nPin-Priority: 1000" > /etc/apt/preferences.d/isar'
Update the APT sources lists:
$ sudo apt update
Tip
If the APT package manager is unable to connect to the repositories, follow these APT troubleshooting tips:
Make sure that the system has network connectivity.
Make sure that the ports
80and8080are not blocked by a firewall.Configure an APT proxy (if network traffic routes through a proxy server). To configure an APT proxy, add the following lines to a file at
/etc/apt/apt.conf.d/proxy.conf(replace the placeholders as per your specific user and proxy server):Acquire::http::Proxy "http://user:password@proxy.server:port/"; Acquire::https::Proxy "http://user:password@proxy.server:port/";
Install Real-Time Linux Kernel#
Modify the APT source to
noble:$ cd /etc/apt/sources.list.d/ $ sudo sed -i 's/jammy/noble/g' eci.list $ sudo apt clean $ sudo apt update
Download the real-time Linux kernel:
$ cd ~/Downloads/
$ sudo apt download linux-intel-rt linux-image-intel-rt linux-headers-intel-rt
Modify the APT source to
jammy:$ cd /etc/apt/sources.list.d/ $ sudo sed -i 's/noble/jammy/g' eci.list $ sudo apt clean $ sudo apt update
Install the real-time Linux kernel:
$ cd ~/Downloads/
$ sudo dpkg -i <linux-headers-intel-rt_xxx>.deb <linux-image-intel-rt_xxx>.deb
Modify the default Linux
cmdlinefile/etc/default/grub:GRUB_CMDLINE_LINUX_DEFAULT="debug=all nosplash console=tty0 clocksource=tsc tsc=reliable art=virtallow no_ipi_broadcast=1 nosoftlockup efi=runtime numa_balancing=disable hugepages=1024 audit=0 nmi_watchdog=0 irqaffinity=0,2,4-7 mce=off hpet=disable rcupdate.rcu_cpu_stall_suppress=1 rcu_nocb_poll noht isolcpus=3 rcu_nocbs=3 nohz_full=3 i915.force_probe=* i915.enable_rc6=0 i915.enable_dc=0 i915.disable_power_well=0 igb.blacklist=no intel_pstate=disable intel.max_cstate=0 intel_idle.max_cstate=0 processor.max_cstate=0 processor_idle.max_cstate=0 nohz=off nowatchdog idle=poll noht iommu=pt rdt=!mba i915.enable_guc=7"Modify the default Linux boot option. Open the file
/etc/default/grub, modifyGRUB_DEFAULT="x>y":$ sudo update-grub
Reboot the target system:
$ sudo reboot
Install iGPU firmware and driver#
Get the correct i915 firmware with the following command:
$ wget https://web.git.kernel.org/pub/scm/linux/kernel/git/firmware/linux-firmware.git/plain/i915/mtl_gsc_1.bin --no-check-certificate
$ wget https://web.git.kernel.org/pub/scm/linux/kernel/git/firmware/linux-firmware.git/plain/i915/mtl_guc_70.bin --no-check-certificate
Remove the
zstfirmware files with the following command (Optional):$ sudo rm /lib/firmware/i915/mtl_guc_70.bin.zst $ sudo rm /lib/firmware/i915/mtl_gsc_1.bin.zst
Update i915 firmware with the following command:
$ sudo cp mtl_guc_70.bin /lib/firmware/i915/
$ sudo cp mtl_gsc_1.bin /lib/firmware/i915/
$ sudo update-initramfs -u -k $(uname -r)
Setup iGPU driver (use PyTorch), Installing Client GPUs on Ubuntu Desktop 22.04 LTS.
Reboot the target system:
$ sudo reboot
JAKA Robot Arm Setup#
This section will provide a step-by-step guide to setup a simulation JAKA robot-arm ROS2 application.
Install PLCopen library#
Install dependency:
$ sudo apt install libeigen3-dev python3-pip python3-venv cmake
$ sudo python3 -m pip install pymodbus==v3.6.9
Install PLCopen dependency:
$ sudo apt install libshmringbuf libshmringbuf-dev plcopen-ruckig plcopen-ruckig-dev plcopen-motion plcopen-motion-dev
Download the source of real time application:
$ cd ~/Downloads/
$ sudo apt source plcopen-databus
Modify the
CMakeLists.txtof the top-level project:$ cd plcopen-databus-0.1.0/ $ sudo vim CMakeLists.txt
Remove the following lines:
#include(${PLCOPEN_CMAKE_MODULE_PATH}/find_igh.cmake)
#include(${PLCOPEN_CMAKE_MODULE_PATH}/find_enablekit.cmake)
#include(${PLCOPEN_CMAKE_MODULE_PATH}/find_plcopen_servo.cmake)
Modify the
CMakeLists.txtof the real-time application:$ sudo vim src/CMakeLists.txt
Remove the following lines:
add_executable(plc_rt_robot_arm plc_rt_robot_arm.cpp)
target_link_libraries(plc_rt_robot_arm ${LIBSHM_LIBRARIES} -lpthread)

add_executable(plc_rt_pos_rtmotion plc_rt_pos_rtmotion.cpp)
target_link_libraries(plc_rt_pos_rtmotion ${RTMOTION_LIBRARIES} ${LIBSHM_LIBRARIES} ruckig::ruckig -lpthread)

add_executable(plc_rt_amr plc_rt_amr.cpp)
target_link_libraries(plc_rt_amr ${LIBSHM_LIBRARIES} -lpthread)

install(TARGETS plc_rt_robot_arm plc_rt_amr plc_rt_pos_rtmotion
   RUNTIME DESTINATION ${INSTALL_BINDIR}
)
Build & install real-time application:
$ cd plcopen-databus-0.1.0/
$ sudo mkdir build && cd build
$ sudo cmake ..
$ sudo make
$ sudo make install
$ sudo depmod
Install ROS2 Iron#
Install dependency:
$ sudo apt update && sudo apt install -y locales curl gnupg2 lsb-release
Setup the Intel® oneAPI APT repository:
$ sudo -E wget -O- https://apt.repos.intel.com/intel-gpg-keys/GPG-PUB-KEY-INTEL-SW-PRODUCTS.PUB | gpg --dearmor | sudo tee /usr/share/keyrings/oneapi-archive-keyring.gpg > /dev/null
$ echo "deb [signed-by=/usr/share/keyrings/oneapi-archive-keyring.gpg] https://apt.repos.intel.com/oneapi all main" | sudo tee /etc/apt/sources.list.d/oneAPI.list
$ sudo apt update
Setup the public ROS2 Iron APT repository:
$ sudo curl -sSL https://raw.githubusercontent.com/ros/rosdistro/master/ros.key  -o /usr/share/keyrings/ros-archive-keyring.gpg
$ echo "deb [arch=$(dpkg --print-architecture) signed-by=/usr/share/keyrings/ros-archive-keyring.gpg] http://packages.ros.org/ros2/ubuntu $(source /etc/os-release && echo $UBUNTU_CODENAME) main" | sudo tee /etc/apt/sources.list.d/ros2.list > /dev/null
$ sudo bash -c 'echo -e "Package: *\nPin: origin eci.intel.com\nPin-Priority: -1" > /etc/apt/preferences.d/isar'
$ sudo apt update
Install ROS2 Iron packages:
$ sudo apt install -y python3-colcon-common-extensions python3-argcomplete python3-pykdl
$ sudo apt install -y ros-iron-desktop ros-iron-moveit* ros-iron-osqp-vendor ros-iron-ament-cmake-google-benchmark librange-v3-dev ros-iron-ros-testing
$ sudo bash -c 'echo -e "Package: *\nPin: origin eci.intel.com\nPin-Priority: 1000" > /etc/apt/preferences.d/isar'
Install JAKA robot arm application#
Download the source code of JAKA robot arm:
$ cd ~/Downloads/
$ sudo apt source ros-humble-pykdl-utils ros-humble-jaka-bringup ros-humble-jaka-description ros-humble-jaka-hardware ros-humble-jaka-moveit-config ros-humble-jaka-moveit-py ros-humble-jaka-servo ros-humble-run-jaka-moveit ros-humble-run-jaka-plc
Create workspace for robot arm source code:
$ mkdir -p ~/ws_jaka/src
$ cp -r ~/Downloads/ros-humble-jaka-bringup-3.2.0/robot_arm/ ~/ws_jaka/src
Build JAKA robot arm source code:
$ cd ~/ws_jaka/ && source /opt/ros/iron/setup.bash
$ touch src/robot_arm/jaka/jaka_servo/COLCON_IGNORE
$ colcon build
FunASR Setup#
This section will provide a step-by-step guide to setup a FunASR (A Fundamental End-to-End Speech Recognition Toolkit) server.
Install dependency#
$ sudo apt-get install cmake libopenblas-dev libssl-dev portaudio19-dev ffmpeg git python3-pip -y
$ python3 -m pip install modelscope==1.17.1 onnx==1.16.2 humanfriendly==10.0 pyaudio websocket==0.2.1 websockets==12.0 translate==3.6.1 kaldi_native_fbank==1.20.0 onnxruntime==1.18.1 torchaudio==2.4.0 openvino==2024.3.0
Add OpenVINO speech model to FunASR#
Install FunASR environment:
$ sudo apt install funasr llm-robotics
$ cd /opt/funasr/
$ sudo bash install_funasr.sh
Install the
asr-openvinomodel script:$ sudo chown -R $USER /opt/funasr/ $ sudo chown -R $USER /opt/llm-robotics/ $ mkdir /opt/funasr/FunASR/funasr/models/intel/ $ cp -r /opt/llm-robotics/asr-openvino-demo/models/* /opt/funasr/FunASR/funasr/models/intel/
Build
asr-openvinomodel:$ cd /opt/funasr/FunASR/ $ python3 -m pip install -e ./ $ python3 ov_convert_FunASR.py $ cp -r ~/.cache/modelscope/hub/iic/speech_seaco_paraformer_large_asr_nat-zh-cn-16k-common-vocab8404-pytorch /opt/llm-robotics/asr-openvino-demo/
Quantitative model using
ovc:$ cd /opt/llm-robotics/asr-openvino-demo/speech_seaco_paraformer_large_asr_nat-zh-cn-16k-common-vocab8404-pytorch/ $ ovc model.onnx --output_model=model_bb_fp16 $ ovc model_eb.onnx --output_model=model_eb_fp16
Modify the
configuration.jsonfile of the speech model:# modify model_name_in_hub.ms & file_path_metas.init_param { "framework": "pytorch", "task" : "auto-speech-recognition", "model": {"type" : "funasr"}, "pipeline": {"type":"funasr-pipeline"}, "model_name_in_hub": { "ms":"", "hf":""}, "file_path_metas": { "init_param":"model_bb_fp16.xml", "config":"config.yaml", "tokenizer_conf": {"token_list": "tokens.json", "seg_dict_file": "seg_dict"}, "frontend_conf":{"cmvn_file": "am.mvn"}} }
Reinstall the
funasrmodel of FunASR:$ cd /opt/funasr/FunASR/ $ python3 -m pip uninstall funasr $ python3 -m pip install -e ./
LLM Setup#
This section will provide a step-by-step guide to setup a virtual Python environment to run LLM demo.
Install Intel oneAPI Base Toolkit 2024.1.0#
Install the packages on Ubuntu:
$ sudo apt install -y intel-oneapi-dpcpp-cpp-2024.1=2024.1.0-963 intel-oneapi-mkl-devel=2024.1.0-691 intel-oneapi-ccl-devel=2021.12.0-309
Setup a virtual environment for application#
Install the
pippackages for LLM:$ cd /opt/llm-robotics/LLM/ $ python3 -m venv venv_name $ source venv_name/bin/activate $ pip install --extra-index-url https://pytorch-extension.intel.com/release-whl/stable/xpu/cn/ -r requirement.txt
Set the environment variable:
$ export HF_ENDPOINT="https://hf-mirror.com"
Setup the MobileSAM model#
Download the MobileSAM weight file:
$ wget https://raw.githubusercontent.com/ChaoningZhang/MobileSAM/refs/heads/master/weights/mobile_sam.pt
Follow the Python script (
/opt/llm-robotics/LLM/mobile_sam_export.py) to export and saveMobileSAMmodel.Modify the loading PATH of models to the exported model path, such as:
# /opt/llm-robotics/LLM/utils/mobilesam_helper.py:L87-L89
ov_sam_encoder_path = f"/home/intel/ov_models/sam_image_encoder.xml"
ov_sam_predictor_path = f"/home/intel/ov_models/sam_mask_predictor.xml"
Setup the CLIP model#
Follow the OpenVINO documentation below to export and save CLIP (ViT-B) model:
Modify the loading PATH of models to the exported model path, such as:
# /opt/llm-robotics/LLM/utils/mobilesam_helper.py:L87-L89
clip_model_path = f"/home/intel/ov_models/clip-vit-base-patch16.xml"
Setup the phi3-mini model#
Follow the documentation below to export and save Phi3-mini-4k models:
Set the environment variable:
$ export HF_HOME="the directory to download LLM model"
Demo Tutorial#
This section will provide a step-by-step guide to launch LLM robotics demo.
Prepare System#
Please connect the following items to the Intel® Core™ Ultra IPC.
Item |
Explanation |
LINK |
|---|---|---|
Camera |
Intel® RealSense™ Depth Camera D435 |
|
USB Mic |
Audio input device of FunASR, 16k sampling rate |
UGREEN CM564 |
Launch LLM Robotic Demo#
The LLM Robotic demo includes the real-time component, non-real-time ROS2 component, and non-real-time LLM component.
Important
Please ensure a stable network connection before running the demo. The FunASR and LLM applications require an active network connection.
Launch the OpenVINO FunASR server:
$ python3 /opt/funasr/FunASR/runtime/python/websocket/funasr_wss_server.py --port 10095 --certfile "" --keyfile "" --asr_model /opt/llm-robotics/asr-openvino-demo/speech_seaco_paraformer_large_asr_nat-zh-cn-16k-common-vocab8404-pytorch/
Launch the real-time application:
$ sudo taskset -c 3 plc_rt_pos_rtmotion
If the real-time application launches successfully, the terminal will show the following:
Axis 0 initialized.
Axis 1 initialized.
Axis 2 initialized.
Axis 3 initialized.
Axis 4 initialized.
Axis 5 initialized.
Function blocks initialized.
Launch the JAKA robot arm ROS2 node:
Important
Execute the following commands as privileged user (
root).$ source ~/ws_jaka/install/setup.bash $ ros2 launch jaka_moveit_py jaka_motion_planning.launch.py
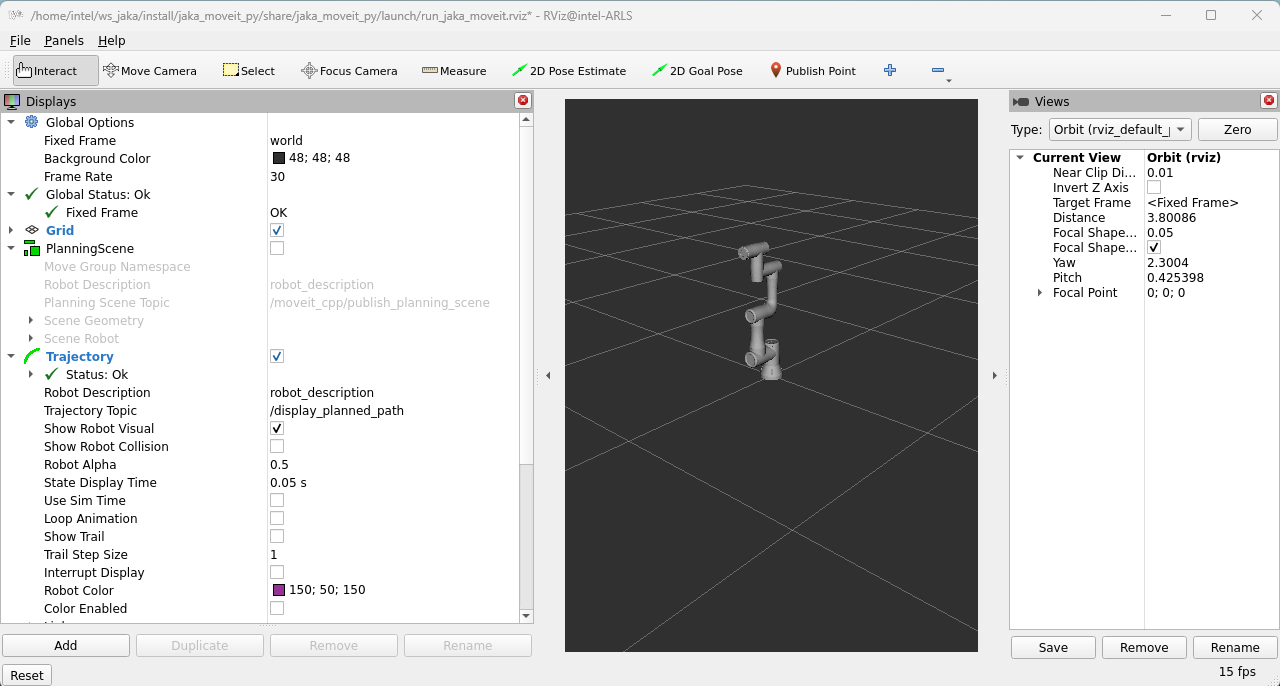
If the ROS2 node launches successfully, RVIZ2 will display the following:
Launch the LLM application:
$ source /opt/intel/oneapi/setvars.sh
$ cd /opt/llm-robotics/LLM/
$ source venv_name/bin/activate
$ python main.py
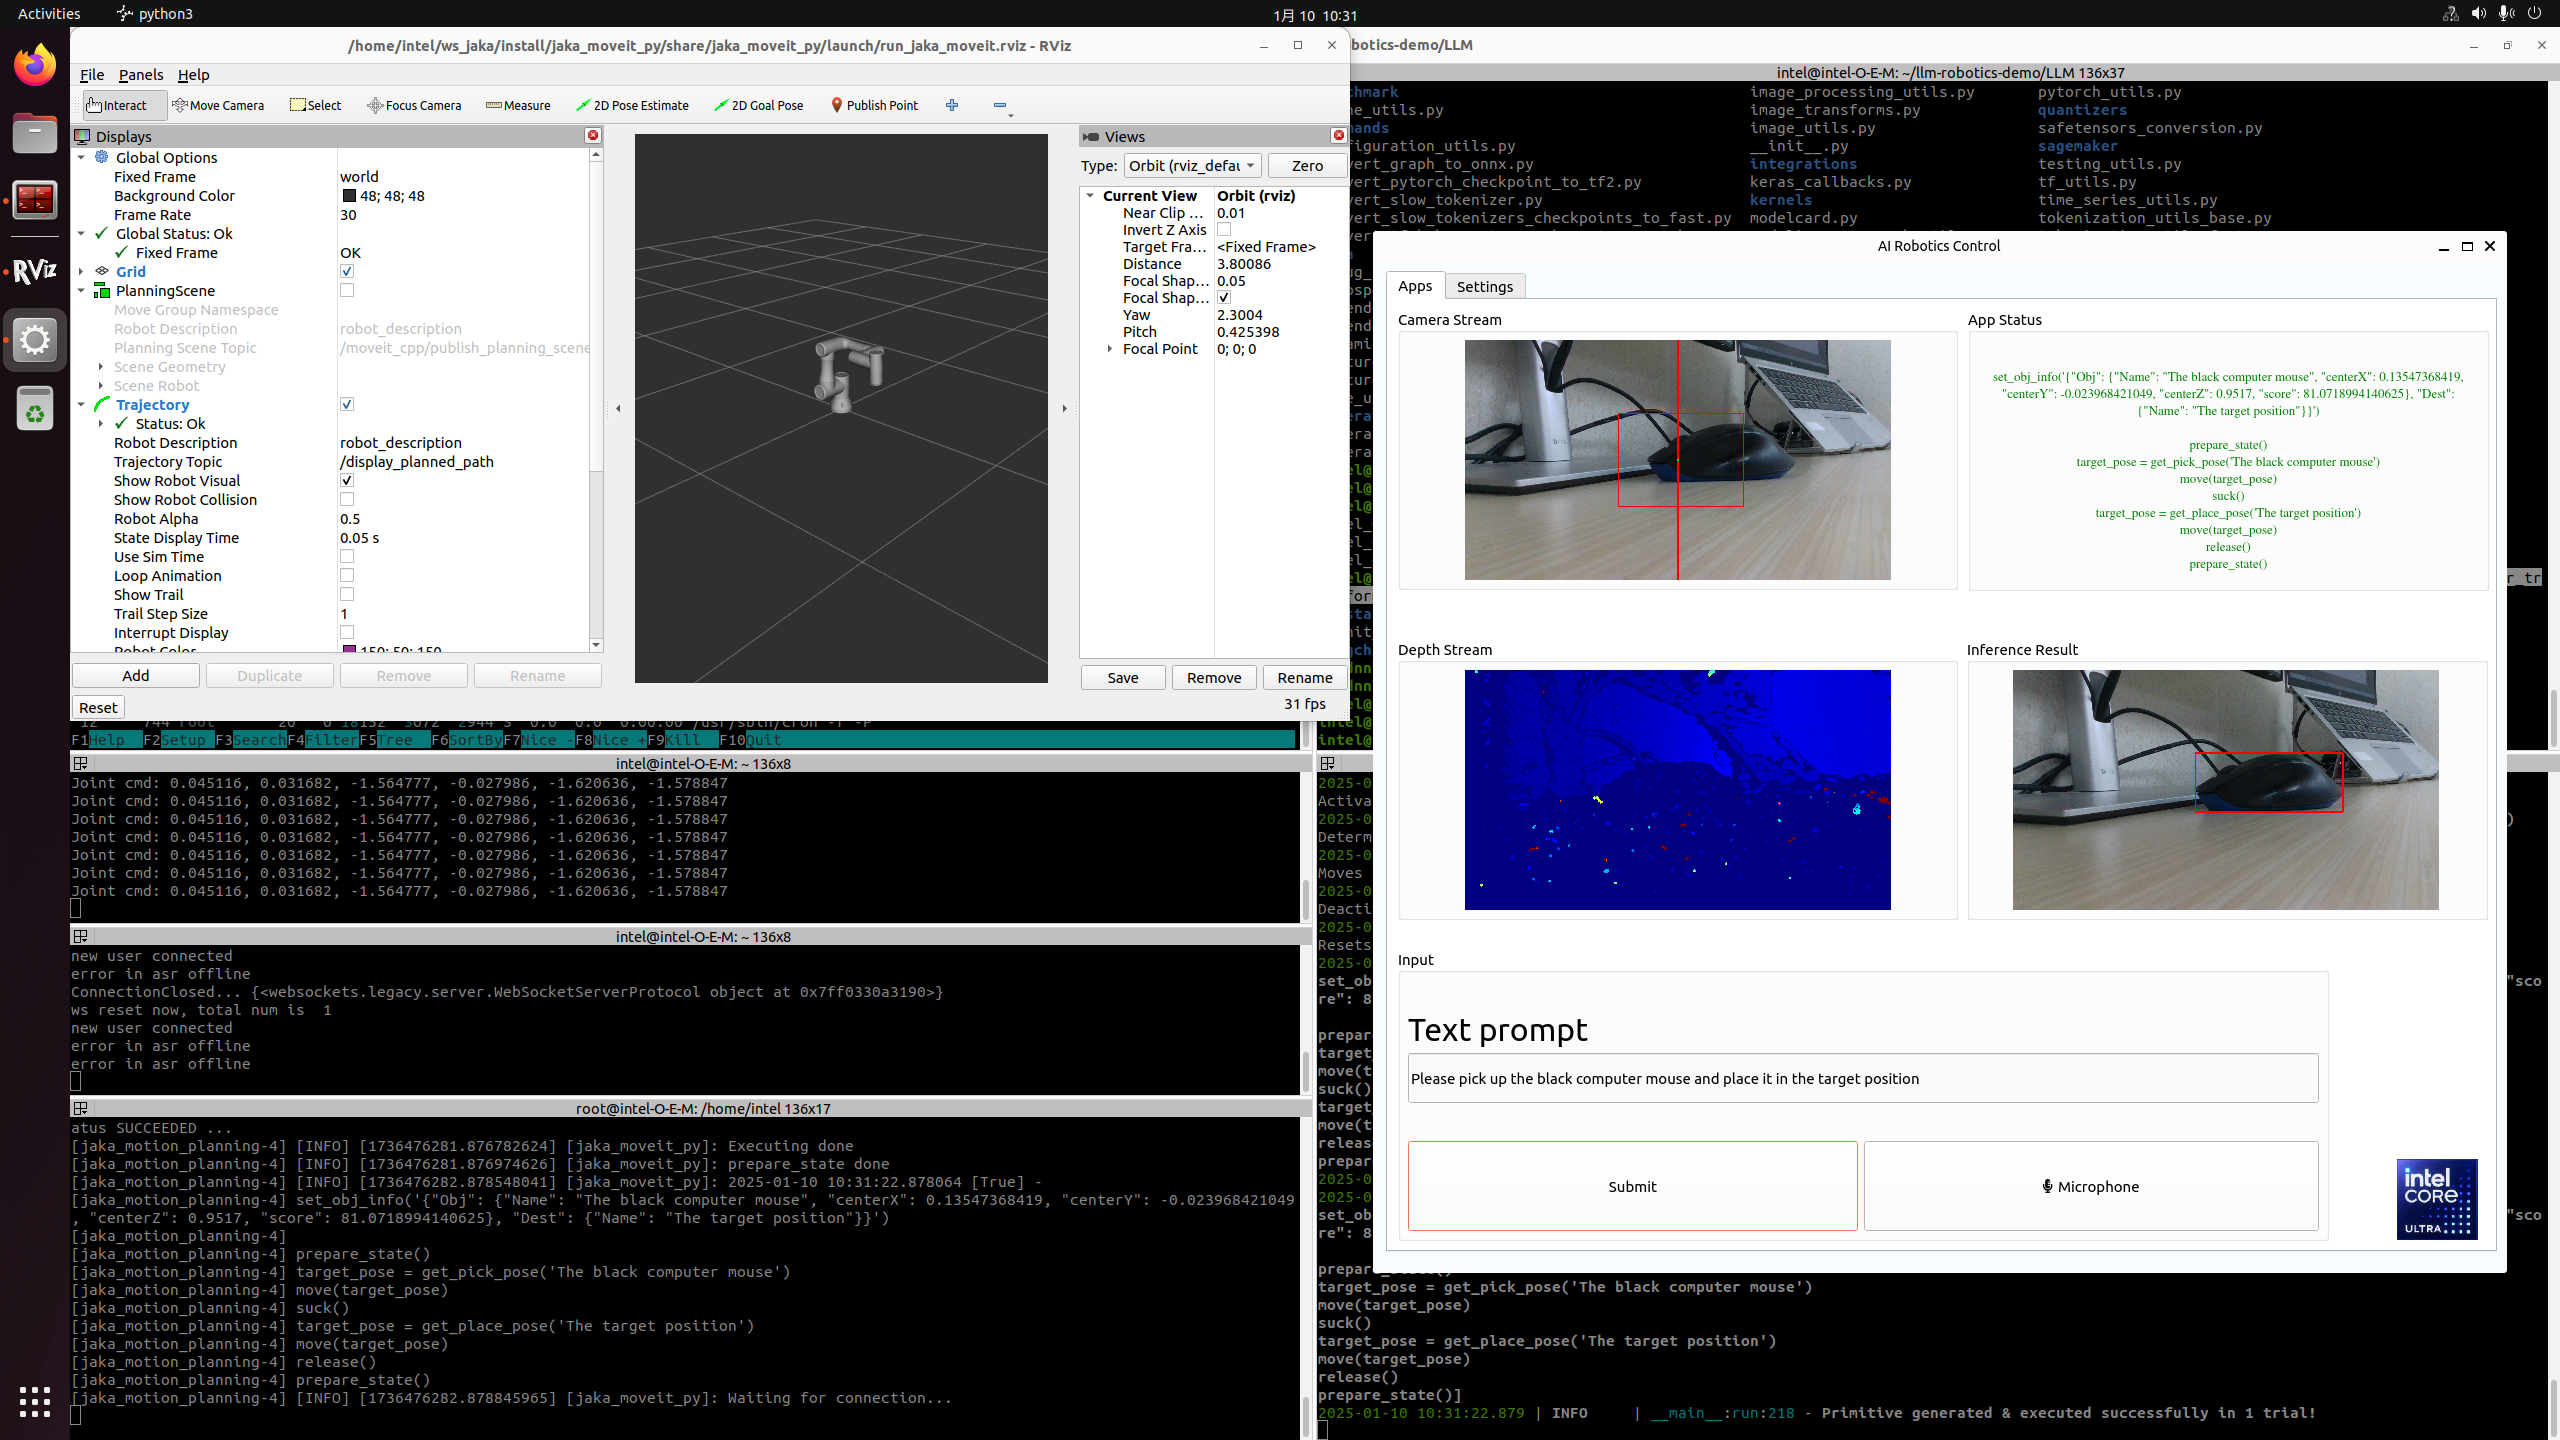
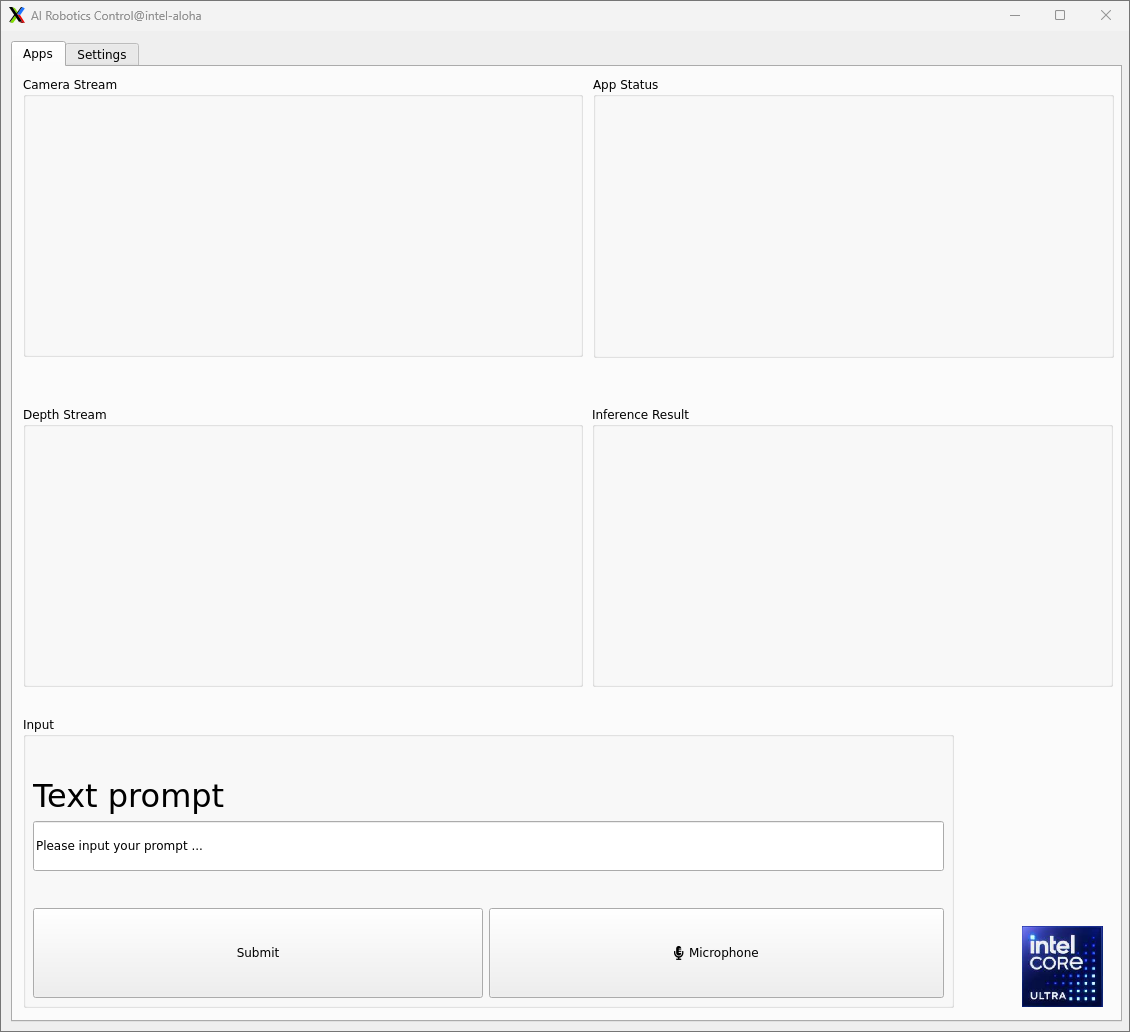
If the LLM application launches successfully, the demo UI will display the following:
Camera Stream & Depth Stream: displays the real-time color and depth streams from the camera.
App status: indicates the status and outcome of code generation.
Inference Result: presents the results from the SAM and CLIP models.
Text prompt: enter prompts in English via keyboard or in Chinese using the microphone. Press the “Submit” button to start the inference process.
Attach a demo picture with the prompt (Please pick up the black computer mouse and place it in the target position) as shown below: