Setting Up An Optimized Intel-Based Linux Real-Time Capable Edge System#
This Configuration Blueprint provides the steps to setup and verify an optimized Intel-based real-time capable system using a preemptible real-time Linux kernel, BIOS configuration, kernel boot parameters, and benchmarks to test performance.
Prepare System#
To get started, install a supported OS distribution on your target system.
Use the table below to determine which supported OS distribution(s) you should use with your Intel® platform to achieve best results:
Distribution
Distribution
Version
「 Intel® platforms 」
Series 1 Core™ Ultra (MTL) Meteor Lake
7000 Series Intel Atom® (ASL) Amston Lake
14th & 13th Gen Core™ (RPL) Raptor Lake
12th Gen Core™ (ADL) Alder Lake
Xeon® D-1700 (ICL-D) Ice Lake D
6000E Series Intel Atom® (EHL) Elkhart Lake
11th Gen Core™ (TGL) Tiger Lake
「 Debian 」
Debian 12 (Bookworm) .
✔
✔
✔
✔
✔
✔
✔
Debian 11 (Bullseye) .
✔
✔
✔
✔
「 Canonical® Ubuntu® 」
Canonical® Ubuntu® 24.04 (Noble Numbat) .
✔
✔
✔
✔
✔
✔
✔
Canonical® Ubuntu® 22.04 (Jammy Jellyfish) .
✔
✔
✔
✔
✔
✔
「 Red Hat® Enterprise Linux® 」
Red Hat® Enterprise Linux® 9.3 (Plow) .
✔
✔
✔
✔
✔
✔
Install the AMD64 variant of your desired OS distribution. Refer to the following table for details:
Attention
Please review Canonical Intellectual property rights policy regarding Canonical® Ubuntu®. Note that any redistribution of modified versions of Canonical® Ubuntu® must be approved, certified or provided by Canonical if you are going to associate it with the Trademarks. Otherwise you must remove and replace the Trademarks and will need to recompile the source code to create your own binaries.
Distribution
Description
Where to Download
Instructions
Debian
Open-source Debian 12 (Bookworm)
Open-source Debian 11 (Bullseye)
Canonical® Ubuntu®
Open-source Canonical® Ubuntu® 24.04 (Noble Numbat)
Open-source Canonical® Ubuntu® 22.04 (Jammy Jellyfish)
Red Hat® Enterprise Linux®
Open-source Red Hat® Enterprise Linux® 9.3 (Plow)
Configure System BIOS#
To achieve real-time determinism and utilize the available Intel® silicon features, you need to configure certain BIOS settings. Reboot the target system and access the BIOS (press the delete or F2 keys while booting to open the BIOS menu).
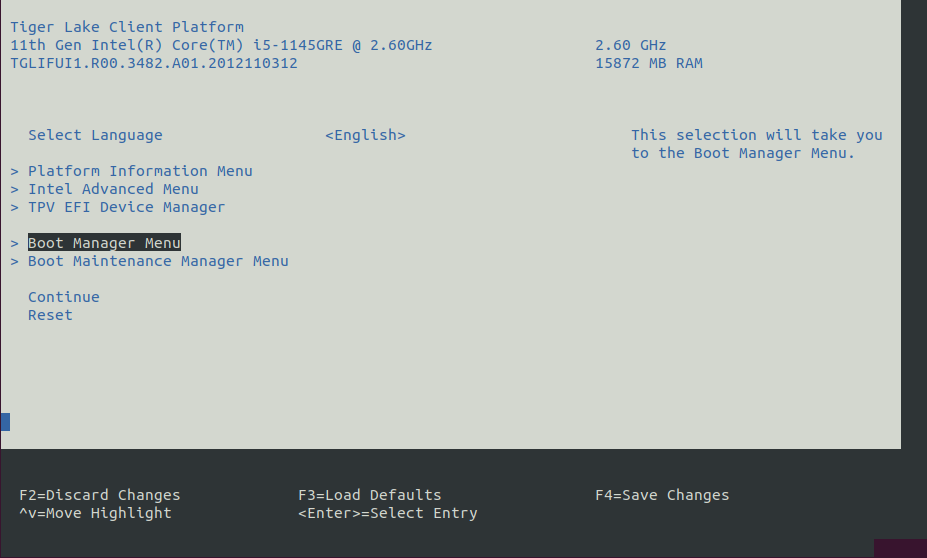
Select Restore Defaults or Load Defaults, and then select Save Changes and Reset. As the target system boots, access the BIOS again.
Modify the BIOS configuration as listed in the following table.
Note: The available configurations depend on the platform, BIOS in use, or both. Modify as many configurations as possible.
Setting Name
Option
Setting Menu
Hyper-Threading
Disabled
Intel Advanced Menu ⟶ CPU Configuration
Intel (VMX) Virtualization
Disabled
Intel Advanced Menu ⟶ CPU Configuration
Intel(R) SpeedStep
Disabled
Intel Advanced Menu ⟶ Power & Performance ⟶ CPU - Power Management Control
Turbo Mode
Disabled
Intel Advanced Menu ⟶ Power & Performance ⟶ CPU - Power Management Control
C States
Disabled
Intel Advanced Menu ⟶ Power & Performance ⟶ CPU - Power Management Control
RC6 (Render Standby)
Disabled
Intel Advanced Menu ⟶ Power & Performance ⟶ GT - Power Management Control
Maximum GT freq
Lowest (usually 100MHz)
Intel Advanced Menu ⟶ Power & Performance ⟶ GT - Power Management Control
SA GV
Fixed High
Intel Advanced Menu ⟶ Memory Configuration
VT-d
Enabled* (see footnote)
Intel Advanced Menu ⟶ System Agent (SA) Configuration
PCI Express Clock Gating
Disabled
Intel Advanced Menu ⟶ System Agent (SA) Configuration ⟶ PCI Express Configuration
Gfx Low Power Mode
Disabled
Intel Advanced Menu ⟶ System Agent (SA) Configuration ⟶ Graphics Configuration
ACPI S3 Support
Disabled
Intel Advanced Menu ⟶ ACPI Settings
Native ASPM
Disabled
Intel Advanced Menu ⟶ ACPI Settings
Legacy IO Low Latency
Enabled
Intel Advanced Menu ⟶ PCH-IO Configuration
PCH Cross Throttling
Disabled
Intel Advanced Menu ⟶ PCH-IO Configuration
Delay Enable DMI ASPM
Disabled
Intel Advanced Menu ⟶ PCH-IO Configuration ⟶ PCI Express Configuration
DMI Link ASPM
Disabled
Intel Advanced Menu ⟶ PCH-IO Configuration ⟶ PCI Express Configuration
Aggressive LPM Support
Disabled
Intel Advanced Menu ⟶ PCH-IO Configuration ⟶ SATA And RST Configuration
USB Periodic SMI
Disabled
Intel Advanced Menu ⟶ LEGACY USB Configuration
VT-dis required by most virtualization solutions (KVM, RTH Hypervisor, ACRN Hypervisor, etc.), so set toenabledfor greatest compatibility. However, if you know that virtualization will not be used, you can safely setVT-dto disabled.
Setting Name
Option
Setting Menu
Logical Processor
Disabled
Processor Settings
Uncore Frequency RAPL
Disabled
Processor Settings
Local Machine Check Exception
Disabled
Processor Settings
System Profile
Custom
System Profile Settings
Optimized Power Mode
Disabled
System Profile Settings
Turbo Boost
Disabled
System Profile Settings
C1E
Disabled
System Profile Settings
C-States
Disabled
System Profile Settings
Uncore Frequency
Maximum
System Profile Settings
Dynamic Load Line Switch
Disabled
System Profile Settings
Energy Efficient Policy
Performance
System Profile Settings
CPU Interconnect Bus Link Power Management
Disabled
System Profile Settings
PCI ASPM L1 Link Power Management
Disabled
System Profile Settings
Workload Configuration
IO Sensitive
System Profile Settings
Setup Package Repository#
![]()
![]()
Setup the ECI APT repository:
Download the ECI APT key to the system keyring:
$ sudo -E wget -O- https://eci.intel.com/repos/gpg-keys/GPG-PUB-KEY-INTEL-ECI.gpg | sudo tee /usr/share/keyrings/eci-archive-keyring.gpg > /dev/null
Add the signed entry to APT sources and configure the APT client to use the ECI APT repository:
$ echo "deb [signed-by=/usr/share/keyrings/eci-archive-keyring.gpg] https://eci.intel.com/repos/$(source /etc/os-release && echo $VERSION_CODENAME) isar main" | sudo tee /etc/apt/sources.list.d/eci.list
$ echo "deb-src [signed-by=/usr/share/keyrings/eci-archive-keyring.gpg] https://eci.intel.com/repos/$(source /etc/os-release && echo $VERSION_CODENAME) isar main" | sudo tee -a /etc/apt/sources.list.d/eci.list
Configure the ECI APT repository to have higher priority over other repositories:
$ sudo bash -c 'echo -e "Package: *\nPin: origin eci.intel.com\nPin-Priority: 1000" > /etc/apt/preferences.d/isar'
Update the APT sources lists:
$ sudo apt update
Tip
If the APT package manager is unable to connect to the repositories, follow these APT troubleshooting tips:
Make sure that the system has network connectivity.
Make sure that the ports
80and8080are not blocked by a firewall.Configure an APT proxy (if network traffic routes through a proxy server). To configure an APT proxy, add the following lines to a file at
/etc/apt/apt.conf.d/proxy.conf(replace the placeholders as per your specific user and proxy server):Acquire::http::Proxy "http://user:password@proxy.server:port/"; Acquire::https::Proxy "http://user:password@proxy.server:port/";
![]()
Setup the ECI DNF repository:
Use the
config-managertool to add the ECI DNF repository to the system:$ sudo dnf config-manager --add-repo https://eci.intel.com/repos/rhel/eci-el9.repo
Verify the ECI DNF repository was correctly added. Run the following command and verify that the ECI DNF repository
eci-el#-rpm-*are present:$ dnf repolist
repo id                          repo name
eci-el9-rpm-x86_64               Intel Edge Controls for Industrial - EL9 (x86_64)
eci-el9-rpm-noarch               Intel Edge Controls for Industrial - EL9 (noarch)
Some of the ECI packages depend on additional DNF repositories, specifically Extra Packages for Enterprise Linux (EPEL). Configure the DNF package manager with these additional DNF repositories:
$ sudo dnf install -y https://dl.fedoraproject.org/pub/epel/epel-release-latest-9.noarch.rpm
Install Real-Time Linux Kernel#
![]()
![]()
Install the real-time Linux kernel and GRUB customizations:
$ sudo apt install -y eci-customizations
$ sudo apt install -y linux-intel-rt
Reboot the target system.
$ sudo reboot
![]()
Install the Red Hat® Enterprise Linux® DNF repository:
$ sudo subscription-manager repos --enable rhel-9-for-x86_64-rt-rpms
The DNF package manager will download the latest list of packages available for all configured repositories.
Tip
If the DNF package manager is unable to connect to the repositories, follow these DNF troubleshooting tips:
Make sure that the system has network connectivity.
Make sure that the port
80is not blocked by a firewall.Configure an DNF proxy (if network traffic routes through a proxy server). To configure an DNF proxy, perform the following command (replace the placeholders as per your specific user and proxy server):
$ sudo subscription-manager config --server.proxy_hostname=<proxy.server> --server.proxy_port=<port>
Red Hat® Enterprise Linux® provides RPM packages group named
RTwhich prepares the system to be deterministic. Install this package group:$ sudo dnf groupinstall RT
Update the GRUB config to set the default kernel to the newly installed real-time kernel. List the available kernels:
$ sudo grubby --info=ALL
index=0
kernel="/boot/vmlinuz-5.14.0-284.30.1.rt14.315.el9_2.x86_64"
args="ro crashkernel=1G-4G:192M,4G-64G:256M,64G-:512M resume=/dev/mapper/rhel_vecow--debian11-swap rd.lvm.lv=rhel_vecow-debian11/root rd.lvm.lv=rhel_vecow-debian11/swap rhgb quiet intel_iommu=on iommu=pt"
root="/dev/mapper/rhel_vecow--debian11-root"
initrd="/boot/initramfs-5.14.0-284.30.1.rt14.315.el9_2.x86_64.img $tuned_initrd"
title="Red Hat Enterprise Linux (5.14.0-284.30.1.rt14.315.el9_2.x86_64) 9.2 (Plow)"
id="41b5c9e83a1b44d7bace7339a08afabe-5.14.0-284.30.1.rt14.315.el9_2.x86_64"
index=1
kernel="/boot/vmlinuz-5.14.0-284.25.1.el9_2.x86_64"
args="ro crashkernel=1G-4G:192M,4G-64G:256M,64G-:512M resume=/dev/mapper/rhel_vecow--debian11-swap rd.lvm.lv=rhel_vecow-debian11/root rd.lvm.lv=rhel_vecow-debian11/swap rhgb quiet intel_iommu=on iommu=pt"
root="/dev/mapper/rhel_vecow--debian11-root"
initrd="/boot/initramfs-5.14.0-284.25.1.el9_2.x86_64.img $tuned_initrd"
title="Red Hat Enterprise Linux (5.14.0-284.25.1.el9_2.x86_64) 9.2 (Plow)"
id="41b5c9e83a1b44d7bace7339a08afabe-5.14.0-284.25.1.el9_2.x86_64"
Set the default kernel to the real-time kernel. Hint: the real-time kernel usually contains
rtin its name:$ sudo grubby --set-default /boot/vmlinuz-5.14.0-284.30.1.rt14.315.el9_2.x86_64
The default is /boot/loader/entries/41b5c9e83a1b44d7bace7339a08afabe-5.14.0-284.30.1.rt14.315.el9_2.x86_64.conf with index 0 and kernel /boot/vmlinuz-5.14.0-284.30.1.rt14.315.el9_2.x86_64Reboot the target system.
$ sudo systemctl reboot
Verify Real-time Linux Kernel#
![]()
![]()
Do the following to complete and verify deployment:
Reboot the target system, if not already done. When the system boots to the GRUB menu, there should be a menu entry for ECI at the top of the GRUB menu list. Select this menu entry, or wait five seconds for this menu entry to automatically boot.
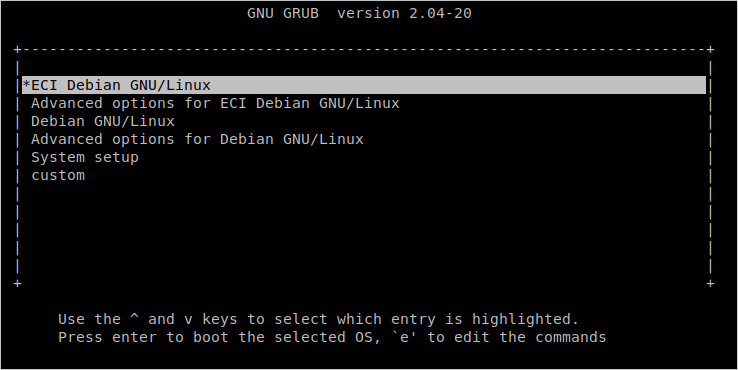
Let the system boot normally.
Note: If the system does not boot, then secure boot may be enabled in the BIOS. You may either disable secure boot in the BIOS, or sign the Linux kernel (details not provided).
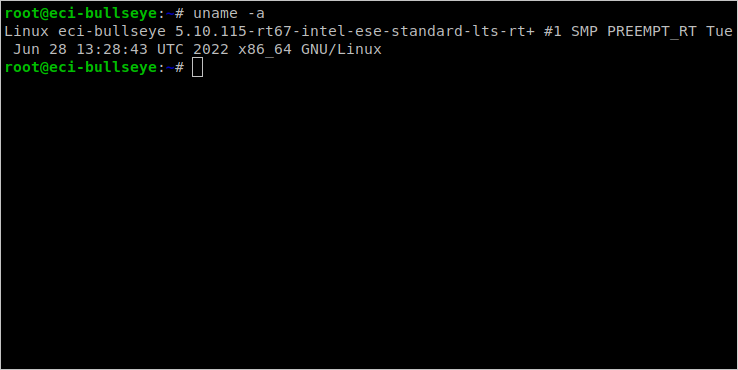
Login to the system and verify that the Linux Intel LTS PREEMPT_RT kernel is active by running the command
uname -a. The output of this command should contain the following:Linux Intel LTS PREEMPT_RT kernel:
...-intel-ese-standard-lts-rt+ #1 SMP PREEMPT_RT ...
![]()
Do the following to complete and verify deployment:
Reboot the target system, if not already done. Let the system boot normally.
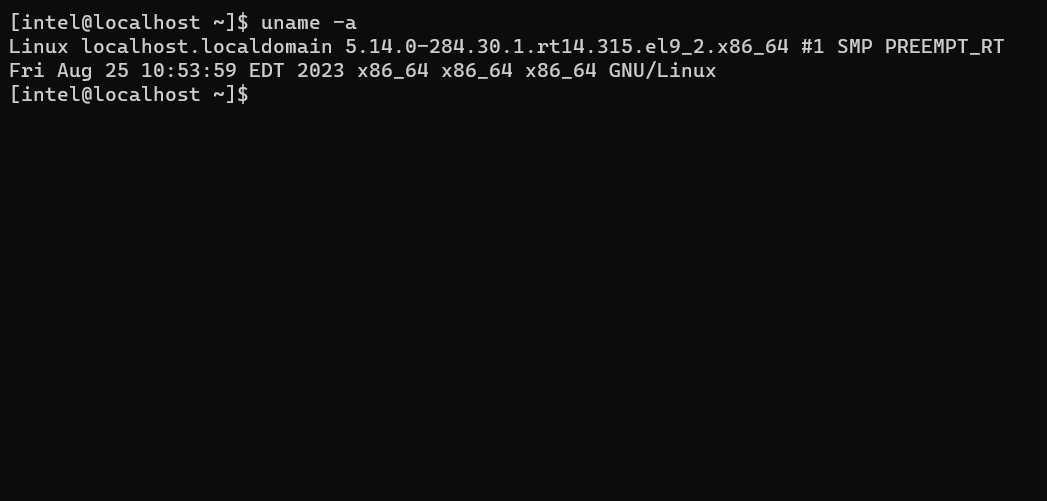
Login to the system and verify that the Linux PREEMPT_RT kernel is active by running the command
uname -a. The output of this command should contain the following:Linux PREEMPT_RT kernel:
...x86_64 #1 SMP PREEMPT_RT ...
Verify Benchmark Performance#
After installing and verifying the real-time Linux kernel, it’s a good idea to benchmark the system to establish confidence that the system is properly configured. This section will guide you through some basic benchmarks you can use to evaluate your system.
Benchmark |
Units |
Version |
Source |
|---|---|---|---|
Cyclictest |
microseconds |
2.4 Debian 12 (Bookworm) / 2.5 Canonical® Ubuntu® 24.04 (Noble Numbat) |
https://git.kernel.org/pub/scm/utils/rt-tests/rt-tests.git/snapshot/rt-tests-1.5.tar.gz |
Cyclictest is most commonly used for benchmarking real-time (RT) systems. It is one of the most frequently used tools for evaluating the relative performance of an RT. Cyclictest accurately and repeatedly measures the difference between a thread’s intended wake-up time and the time at which it actually wakes up to provide statistics about the system’s latency. It can measure latency in real-time systems caused by the hardware, the firmware, and the operating system.
Verify: Install Cyclictest Workload#
Perform either of the following commands to install this component:
![]()
![]()
- Install from meta-package
$ sudo apt install eci-realtime-benchmarking
- Install from individual Deb package
$ sudo apt install rt-tests-scripts
![]()
- Install from meta-package
$ sudo dnf install eci-realtime-benchmarking
- Install from individual RPM package
$ sudo dnf install rt-tests-scripts
Verify: Execute Cyclictest Workload#
An example script that runs the cyclictest benchmark and the README is available at /opt/benchmarking/rt-tests. The script performs the following runtime optimizations before executing the benchmark:
Assigns benchmark thread affinity to last isolated core (typically core 3)
Assigns non-benchmark thread affinity to core 0
Changes the priority of benchmark thread to 95 (using:
chrt -f 95)Disables kernel machine check interrupt
Increases thread runtime utilization to infinity
To start the benchmark, run the following command:
$ sudo /opt/benchmarking/rt-tests/start-cyclic.py
Default parameters are used unless otherwise specified. Run the script with --help to list the modifiable arguments.
Verify: Interpret Cyclictest Results#
Short |
Explanation |
|---|---|
T |
Thread: Thread index and thread ID |
P |
Priority: RT thread priority |
I |
Interval: Intended wake up period for the latency measuring threads |
C |
Count: Number of times the latency was measured that is, iteration count |
Min |
Minimum: Minimum latency that was measured |
Act |
Actual: Latency measured during the latest completed iteration |
Avg |
Average: Average latency that was measured |
Max |
Maximum: Maximum latency that was measured |
On a non-realtime system, the result might be similar to the following:
T: 0 ( 3431) P:99 I:1000 C: 100000 Min:      5 Act:   10 Avg:   14 Max:   39242
T: 1 ( 3432) P:98 I:1500 C:  66934 Min:      4 Act:   10 Avg:   17 Max:   39661
The right-most column contains the most important result, that is, the worst-case latency of 39.242 ms / 39242 us (Max value).
On a realtime-enabled system, the result might be similar to the following:
T: 0 ( 3407) P:99 I:1000 C: 100000 Min:      7 Act:   10 Avg:   10 Max:      18
T: 1 ( 3408) P:98 I:1500 C:  67043 Min:      7 Act:    8 Avg:   10 Max:      22
This result indicates an apparent short-term worst-case latency of 18 us. According to this, it is important to pay attention to the Max values as these are indicators of outliers. Even if the system has decent Avg (average) values, a single outlier as indicated by Max is enough to break or disturb a real-time system.