Implementing Converged Mixed-Criticality Workloads on Intel-Based Virtualized Systems#
Overview#
Industrial systems have traditionally relied on discrete infrastructures to separate real-time workloads from non-critical tasks like monitoring and analytics. However, the industry is shifting toward virtualized, converged architectures that unify mixed-criticality workloads—real-time control, best-effort processes, and modern AI inference—on shared platforms. This approach reduces hardware complexity, improves scalability, and supports edge computing for localized processing.
While concerns about latency variability and resource contention remain, this reference implementation demonstrates how real-time workloads can coexist with AI inference and other non-critical tasks in a unified Intel-based virtualized environment, ensuring deterministic performance without sacrificing flexibility or innovation.
How it Works#
This Reference Implementation demonstrates how to execute real-time workloads alongside non-critical tasks in a virtualized environment using Intel-based systems. Key strategies include:
CPU isolation and affinity: Isolating specific CPUs on the host and pinning VM vCPUs to these isolated cores.
NUMA-aware resource allocation: Assigning virtual CPUs to physical CPUs within the same NUMA node.
Cache Allocation Technology: Using Intel’s CAT to dedicate portions of L3 cache to specific VM workloads.
Hypervisor and kernel tuning: Optimizing KVM with real-time Linux kernels to reduce scheduling jitter.
Mixed-criticality scheduling: Configuring different priorities for housekeeping and real-time tasks within the VM.
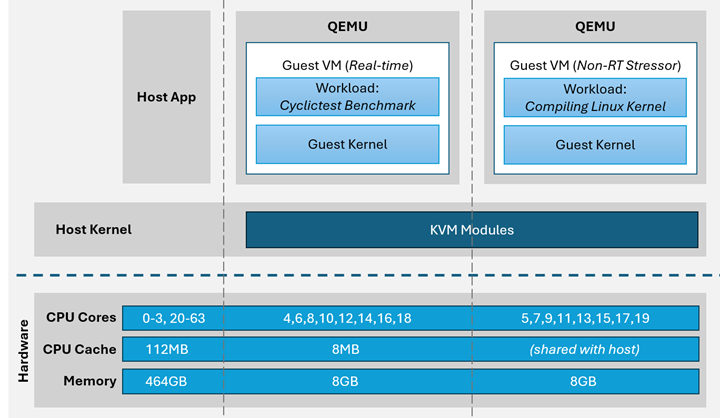
The implementation includes creating and configuring both a real-time VM and a stressor VM to demonstrate performance under load. It uses tools like virsh for VM management and cyclictest for benchmarking real-time performance.
With the correct host and guest configuration, it is possible to execute real-time workloads in a VM. This reference will provide a detailed guide to realize real-time VMs using the KVM Hypervisor managed with virsh.
Prepare System#
To get started, install a supported OS distribution on your target system:
Use the table below to determine which supported OS distribution(s) you should use with your Intel® platform to achieve best results:
Distribution
Distribution
Version
「 Intel® platforms 」
Series 1 Core™ Ultra (MTL) Meteor Lake
7000 Series Intel Atom® (ASL) Amston Lake
14th & 13th Gen Core™ (RPL) Raptor Lake
12th Gen Core™ (ADL) Alder Lake
Xeon® D-1700 (ICL-D) Ice Lake D
6000E Series Intel Atom® (EHL) Elkhart Lake
11th Gen Core™ (TGL) Tiger Lake
「 Debian 」
Debian 12 (Bookworm) .
✔
✔
✔
✔
✔
✔
✔
Debian 11 (Bullseye) .
✔
✔
✔
✔
「 Canonical® Ubuntu® 」
Canonical® Ubuntu® 24.04 (Noble Numbat) .
✔
✔
✔
✔
✔
✔
✔
Canonical® Ubuntu® 22.04 (Jammy Jellyfish) .
✔
✔
✔
✔
✔
✔
「 Red Hat® Enterprise Linux® 」
Red Hat® Enterprise Linux® 9.3 (Plow) .
✔
✔
✔
✔
✔
✔
Install the AMD64 variant of your desired OS distribution. Refer to the following table for details:
Attention
Please review Canonical Intellectual property rights policy regarding Canonical® Ubuntu®. Note that any redistribution of modified versions of Canonical® Ubuntu® must be approved, certified or provided by Canonical if you are going to associate it with the Trademarks. Otherwise you must remove and replace the Trademarks and will need to recompile the source code to create your own binaries.
Distribution
Description
Where to Download
Instructions
Debian
Open-source Debian 12 (Bookworm)
Open-source Debian 11 (Bullseye)
Canonical® Ubuntu®
Open-source Canonical® Ubuntu® 24.04 (Noble Numbat)
Open-source Canonical® Ubuntu® 22.04 (Jammy Jellyfish)
Red Hat® Enterprise Linux®
Open-source Red Hat® Enterprise Linux® 9.3 (Plow)
Host Configuration#
Before a real-time VM can be realized, it is necessary to make the host real-time capable as well. To accomplish this, all the typical configuration will be applied in addition to isolating as many CPUs as possible, with special consideration given to non-uniform memory access (NUMA) which may be present on multi-socket systems.
Host Configuration: BIOS#
Configure the system BIOS to minimize CPU power state transitions and frequency scaling:
To achieve real-time determinism and utilize the available Intel® silicon features, you need to configure certain BIOS settings. Reboot the target system and access the BIOS (press the delete or F2 keys while booting to open the BIOS menu).
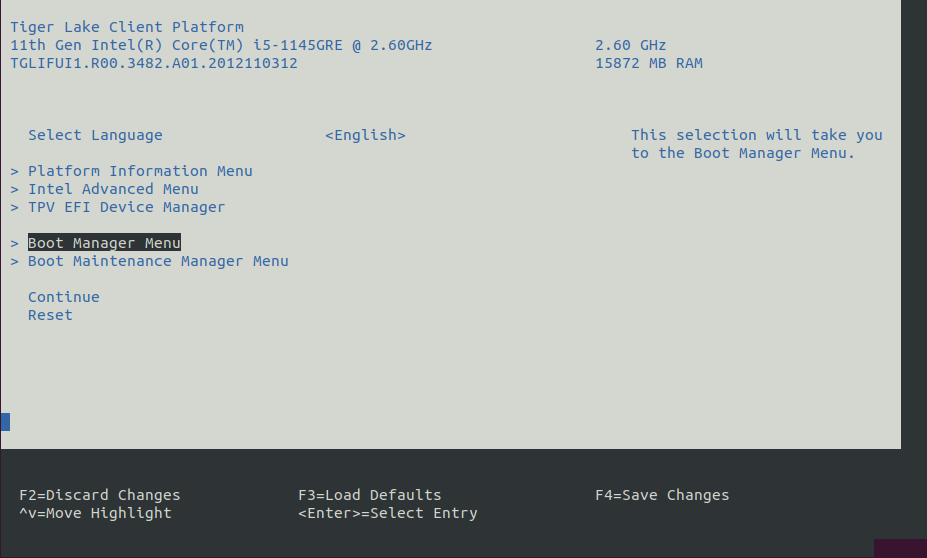
Select Restore Defaults or Load Defaults, and then select Save Changes and Reset. As the target system boots, access the BIOS again.
Modify the BIOS configuration as listed in the following table.
Note: The available configurations depend on the platform, BIOS in use, or both. Modify as many configurations as possible.
Setting Name
Option
Setting Menu
Hyper-Threading
Disabled
Intel Advanced Menu ⟶ CPU Configuration
Intel (VMX) Virtualization
Enabled
Intel Advanced Menu ⟶ CPU Configuration
Intel(R) SpeedStep
Disabled
Intel Advanced Menu ⟶ Power & Performance ⟶ CPU - Power Management Control
Turbo Mode
Disabled
Intel Advanced Menu ⟶ Power & Performance ⟶ CPU - Power Management Control
C States
Disabled
Intel Advanced Menu ⟶ Power & Performance ⟶ CPU - Power Management Control
RC6 (Render Standby)
Disabled
Intel Advanced Menu ⟶ Power & Performance ⟶ GT - Power Management Control
Maximum GT freq
Lowest (usually 100MHz)
Intel Advanced Menu ⟶ Power & Performance ⟶ GT - Power Management Control
SA GV
Fixed High
Intel Advanced Menu ⟶ Memory Configuration
VT-d
Enabled
Intel Advanced Menu ⟶ System Agent (SA) Configuration
PCI Express Clock Gating
Disabled
Intel Advanced Menu ⟶ System Agent (SA) Configuration ⟶ PCI Express Configuration
Gfx Low Power Mode
Disabled
Intel Advanced Menu ⟶ System Agent (SA) Configuration ⟶ Graphics Configuration
ACPI S3 Support
Disabled
Intel Advanced Menu ⟶ ACPI Settings
Native ASPM
Disabled
Intel Advanced Menu ⟶ ACPI Settings
Legacy IO Low Latency
Enabled
Intel Advanced Menu ⟶ PCH-IO Configuration
PCH Cross Throttling
Disabled
Intel Advanced Menu ⟶ PCH-IO Configuration
Delay Enable DMI ASPM
Disabled
Intel Advanced Menu ⟶ PCH-IO Configuration ⟶ PCI Express Configuration
DMI Link ASPM
Disabled
Intel Advanced Menu ⟶ PCH-IO Configuration ⟶ PCI Express Configuration
Aggressive LPM Support
Disabled
Intel Advanced Menu ⟶ PCH-IO Configuration ⟶ SATA And RST Configuration
USB Periodic SMI
Disabled
Intel Advanced Menu ⟶ LEGACY USB Configuration
Setting Name
Option
Setting Menu
Logical Processor
Disabled
Processor Settings
Uncore Frequency RAPL
Disabled
Processor Settings
Local Machine Check Exception
Disabled
Processor Settings
System Profile
Custom
System Profile Settings
Optimized Power Mode
Disabled
System Profile Settings
Turbo Boost
Disabled
System Profile Settings
C1E
Disabled
System Profile Settings
C-States
Disabled
System Profile Settings
Uncore Frequency
Maximum
System Profile Settings
Dynamic Load Line Switch
Disabled
System Profile Settings
Energy Efficient Policy
Performance
System Profile Settings
CPU Interconnect Bus Link Power Management
Disabled
System Profile Settings
PCI ASPM L1 Link Power Management
Disabled
System Profile Settings
Workload Configuration
IO Sensitive
System Profile Settings
Host Configuration: Package Repository#
![]()
![]()
Setup the ECI APT repository:
Download the ECI APT key to the system keyring:
$ sudo -E wget -O- https://eci.intel.com/repos/gpg-keys/GPG-PUB-KEY-INTEL-ECI.gpg | sudo tee /usr/share/keyrings/eci-archive-keyring.gpg > /dev/null
Add the signed entry to APT sources and configure the APT client to use the ECI APT repository:
$ echo "deb [signed-by=/usr/share/keyrings/eci-archive-keyring.gpg] https://eci.intel.com/repos/$(source /etc/os-release && echo $VERSION_CODENAME) isar main" | sudo tee /etc/apt/sources.list.d/eci.list
$ echo "deb-src [signed-by=/usr/share/keyrings/eci-archive-keyring.gpg] https://eci.intel.com/repos/$(source /etc/os-release && echo $VERSION_CODENAME) isar main" | sudo tee -a /etc/apt/sources.list.d/eci.list
Configure the ECI APT repository to have higher priority over other repositories:
$ sudo bash -c 'echo -e "Package: *\nPin: origin eci.intel.com\nPin-Priority: 1000" > /etc/apt/preferences.d/isar'
Update the APT sources lists:
$ sudo apt update
Tip
If the APT package manager is unable to connect to the repositories, follow these APT troubleshooting tips:
Make sure that the system has network connectivity.
Make sure that the ports
80and8080are not blocked by a firewall.Configure an APT proxy (if network traffic routes through a proxy server). To configure an APT proxy, add the following lines to a file at
/etc/apt/apt.conf.d/proxy.conf(replace the placeholders as per your specific user and proxy server):Acquire::http::Proxy "http://user:password@proxy.server:port/"; Acquire::https::Proxy "http://user:password@proxy.server:port/";
Host Configuration: Dependencies#
Install the necessary dependencies:
Run the following command to install the dependencies needed to use KVM and
virsh:$ sudo apt install util-linux wget whois qemu-kvm libvirt-daemon-system libvirt-clients bridge-utils qemu-utils virtinst libosinfo-bin osinfo-db-tools
Add the current user to the
libvirtgroup:$ sudo usermod --append --groups libvirt "$(whoami)"
Host Configuration: Topology#
It is important to understand the underlying architecture of the system processor when configuring a system to host real-time VMs. Special care should be taken to ensure that VMs are only assigned CPUs from the same NUMA node to maximize memory locality.
Execute
lscputo gather information about the CPU architecture:$ lscpuThe output should be similar to the following:
Architecture:             x86_64
  CPU op-mode(s):         32-bit, 64-bit
  Address sizes:          46 bits physical, 57 bits virtual
  Byte Order:             Little Endian
CPU(s):                   64
  On-line CPU(s) list:    0-63
Vendor ID:                GenuineIntel
  BIOS Vendor ID:         Intel
  Model name:             INTEL(R) XEON(R) GOLD 6548Y+
    BIOS Model name:      INTEL(R) XEON(R) GOLD 6548Y+  CPU @ 2.5GHz
    BIOS CPU family:      179
    CPU family:           6
    Model:                207
    Thread(s) per core:   1
    Core(s) per socket:   32
    Socket(s):            2
    Stepping:             2

...

Virtualization features:
  Virtualization:         VT-x
Caches (sum of all):
  L1d:                    3 MiB (64 instances)
  L1i:                    2 MiB (64 instances)
  L2:                     128 MiB (64 instances)
  L3:                     120 MiB (2 instances)
NUMA:
  NUMA node(s):           2
  NUMA node0 CPU(s):      0,2,4,6,8,10,12,14,16,18,20,22,24,26,28,30,32,34,36,38,40,42,44,46,48,50,52,54,56,58,60,62
  NUMA node1 CPU(s):      1,3,5,7,9,11,13,15,17,19,21,23,25,27,29,31,33,35,37,39,41,43,45,47,49,51,53,55,57,59,61,63

...
Determine the number of CPUs available by observing the
CPU(s)value. In this example, the number of CPUs available is64.Determine the number of processors (sockets) and CPUs per processor (cores per socket) by observing the
Socket(s)andCore(s) per socketvalues respectively. In this example, the number of sockets is2and the number of cores per socket is32.Determine the amount of L3 cache by observing the
L3value. In this example, the amount of L3 cache is120 MiBsplit across two sockets.Determine the NUMA system (if any) by observing the
NUMA node# CPU(s)values. Each processor is typically assigned a NUMA node and the logical CPUs which comprise each NUMA node are listed in theNUMA node# CPU(s)values. In this example, the number ofNUMA node(s)is2, the CPUs from the socket 0 processor are assigned even numerical values0,2,4,..., and the CPUs from the socket 1 processor are assigned odd numerical values1,3,5,.... This will be important to know in later steps to properly assign CPU affinity.
Host Configuration: Linux Kernel#
Install the real-time Linux kernel and GRUB customizations:
$ sudo apt install -y eci-customizations
$ sudo apt install -y linux-intel-rt
Modify the GRUB configuration to isolate a majority of CPUs available. The exact CPUs to isolate depend on how many CPUs are available, what workloads (if any) will be running on the host (other than KVM), and the NUMA system (if any). Do not isolate CPU
0, since this will be used by Linux as a housekeeping core. As a general rule, keep at least one CPU reserved (non-isolated) from each socket (Refer to Host Configuration: Topology to determine NUMA system).In this example, CPUs
0-3will be reserved, while CPUs4-63will be isolated. This reserves two CPUs per each NUMA node: CPUs0and1for socket 0, and CPUs1and3for socket 1. Adjust the CPUs assigned to theISOLCPUSvariable in the command below per your specific platform and needs:$ export ISOLCPUS="4-63" $ sudo -E sed -i "/^echo \"set eci_cmdline/iisolcpus=${ISOLCPUS}" /etc/grub.d/09_eci
Update the GRUB configuration and reboot the host:
$ sudo update-grub
$ sudo reboot
Let the host fully boot, then login and verify that the Linux boot parameters are as expected:
$ cat /proc/cmdline
The output should be similar to the following:
BOOT_IMAGE=/vmlinuz-6.6.23-rt28-intel-ese-standard-lts-rt root=/dev/mapper/ubuntu--vg-ubuntu--lv ro debug=all nosplash console=ttyS0,115200 console=tty0 clocksource=tsc tsc=reliable art=virtallow no_ipi_broadcast=1 nosoftlockup efi=runtime numa_balancing=disable hugepages=1024 audit=0 nmi_watchdog=0 irqaffinity=0 mce=off hpet=disable rcupdate.rcu_cpu_stall_suppress=1 rcu_nocb_poll noht isolcpus=4-63 rcu_nocbs=4-63 nohz_full=4-63 intel_pstate=disable intel.max_cstate=0 intel_idle.max_cstate=0 processor.max_cstate=0 processor_idle.max_cstate=0 i915.force_probe=* i915.enable_rc6=0 i915.enable_dc=0 i915.disable_power_well=0 i915.enable_guc=3 igb.blacklist=no
Real-Time VM Image Creation#
In this section, a new real-time VM image will be created using virsh and cloud-init.
Configure the default network used by VMs:
$ sudo virsh net-define /usr/share/libvirt/networks/default.xml
Note
If the above path is not available, try the following path instead:
/etc/libvirt/qemu/networks/default.xmlConfigure the network to automatically start:
$ sudo virsh net-autostart default
$ sudo virsh net-start default
Download the latest release of OSInfo Database:
$ wget -O "/tmp/osinfo-db.tar.xz" "https://releases.pagure.org/libosinfo/osinfo-db-20240701.tar.xz"
Note
Check for the latest release available here: https://releases.pagure.org/libosinfo/
Import the latest OSInfo Database:
$ sudo osinfo-db-import --local "/tmp/osinfo-db.tar.xz"
Export a variables called
DISTRO,TYPE, andUSERNAMEto simplify future commands. In this example, a Debian 12 (Bookworm) VM will be created, so theDISTROvariable is set todebian12, theTYPEvariable is set tort, and theUSERNAMEvariable is set todebian. Adjust these variables value per your use case:$ export DISTRO="debian12" $ export TYPE="rt" $ export USERNAME="debian"
Create a directory to hold base images and VM images:
$ sudo mkdir -p "/var/lib/libvirt/images/base"
$ sudo -E mkdir -p "/var/lib/libvirt/images/${DISTRO}-${TYPE}"
Download a cloud-init image. In this example, a Debian 12 (Bookworm) cloud-init image will be downloaded:
$ sudo -E wget -O "/var/lib/libvirt/images/base/${DISTRO}-cloudimage-amd64.qcow2" "https://cloud.debian.org/images/cloud/bookworm/latest/debian-12-generic-amd64.qcow2"
Note
Here are some helpful links to other cloud-init images:
Debian 12 (Bookworm) - https://cloud.debian.org/images/cloud/bookworm/latest/debian-12-generic-amd64.qcow2
Debian 11 (Bullseye) - https://cloud.debian.org/images/cloud/bullseye/latest/debian-11-generic-amd64.qcow2
Canonical® Ubuntu® 24.04 (Noble Numbat) - https://cloud-images.ubuntu.com/noble/current/noble-server-cloudimg-amd64.img
Canonical® Ubuntu® 22.04 (Jammy Jellyfish) - https://cloud-images.ubuntu.com/jammy/current/jammy-server-cloudimg-amd64.img
Create a VM image:
$ sudo -E qemu-img create -f qcow2 -F qcow2 -o backing_file="/var/lib/libvirt/images/base/${DISTRO}-cloudimage-amd64.qcow2" "/var/lib/libvirt/images/${DISTRO}-${TYPE}/${DISTRO}-${TYPE}.qcow2"
Resize the VM image. In this example, the VM image is resized to 10G. Adjust this value per your use case:
$ sudo -E qemu-img resize "/var/lib/libvirt/images/${DISTRO}-${TYPE}/${DISTRO}-${TYPE}.qcow2" 10G
Create a hashed password for the VM user. This uses a salt to generate a new hashed password. Replace
<salt>with a string of at least 8 characters, and then replace<password>with your desired password:$ export PASSWORD=$(echo '<password>' | mkpasswd -m sha-512 -S '<salt>' -s)
Example: Will reproduce the same hashed password
$ echo 'apple' | mkpasswd -m sha-512 -S 'banana123' -s
  $6$banana123$wQ1IqKwmt6fbNfzB31o0JC1PTG/TdbxTMkB5gx0RyzujPINAifkV1shcE7HW7d.jnVTs5QyuFZBid8NmYf2oq.
Create a cloud-init user-data file, which will be used to initialize the VM during installation:
$ sudo -E tee "/var/lib/libvirt/images/${DISTRO}-${TYPE}/user-data" > /dev/null <<EOF
#cloud-config
users:
  - name: ${USERNAME}
    passwd: "${PASSWORD}"
    sudo: ['ALL=(ALL) NOPASSWD:ALL']
    groups: [ sudo ]
    shell: /bin/bash
    lock_passwd: false

EOF
Note
The default username used by cloud-init images is
debianandubuntufor Debian and Canonical® Ubuntu® images respectively.Decide how much RAM the VM should be allocated. In this example, the VM will be allocated 8 GB (8129 MB) of RAM:
$ export RAM=8129
Execute the
virt-installcommand to install the VM image:$ virt-install --connect qemu:///system --virt-type kvm --name "${DISTRO}-${TYPE}" --vcpus 8 --ram "${RAM}" --os-variant "${DISTRO}" --disk path="/var/lib/libvirt/images/${DISTRO}-${TYPE}/${DISTRO}-${TYPE}.qcow2",format=qcow2 --cloud-init user-data="/var/lib/libvirt/images/${DISTRO}-${TYPE}/user-data" --import --network network=default --noautoconsole
Tip
See the following tips:
The amount of CPUs allocated to the VM will be updated at a later step. At the moment, the VM is only allocated 8 CPUs.
To list the accepted values for
--os-variant, execute:osinfo-query osIf you have already created a VM with the same name, you will need to remove the existing VM first:
$ sudo -E virsh --connect qemu:///system destroy "${DISTRO}-${TYPE}"
$ sudo -E virsh --connect qemu:///system undefine "${DISTRO}-${TYPE}"
Verify that the VM is running:
$ sudo virsh list
There should be a VM running with the same name defined by the
DISTROandTYPEvariables:Id Name State --------------------------------- 1 debian12-rt running
Real-Time VM Configuration#
In this section, the real-time VM will be configured to map isolated CPUs from the host to virtual CPUs in the VM, and setup Cache Allocation Technology to isolate CPU cache for the real-time VM.
Turn off the real-time VM so that its configuration can be modified:
$ sudo -E virsh destroy "${DISTRO}-rt"
Note
This section assumes that the
TYPEvariable was set tortwhen creating the real-time VM. Adjust as necessary.Cache Allocation Technology is exposed as a mountable virtual file system located at
/sys/fs/resctrl. Mount this filesystem:Attention
Verify that your processor supports Intel® Cache Allocation Technology by checking the “Processor Support List” in Intel® Resource Director Technology (Intel® RDT) Architecture Specification.
If your processor does not support Intel® Cache Allocation Technology, then skip this and the next step.
$ sudo mount -t resctrl resctrl /sys/fs/resctrl/
To successfully allocate CPU cache to a real-time VM, each VM must receive a contiguous region of cache ways. Cache allocations cannot reuse cache ways claimed by existing allocations, and the contiguous region must be large enough to satisfy the cache demand.
- Step 1 - Determine how many cache ways are available:
$ cat /sys/fs/resctrl/schemata
The output should contain a line with
L3::L3:0=7fff;1=7fffIn this example, there are 19 (Hex:
0x7fff, Bitmask:0111 1111 1111 1111 1111) L3 cache ways available per processor.Note
If the CPU only supports L2 cache, you may see an output similar to
L2:0=3ff;1=3ff;2=3ff;3=3ff;4=3ff;5=3ff;6=3ff;7=3ff;8=3ff;9=3ff. If you choose to use L2 cache instead of L3 cache, adjust the instructions in this guide accordingly (generally replaceL3withL2).- Step 2 - Determine how much cache each cache way represents:
Since the system has
120 MiB (2 instances)of L3 cache (refer to Host Configuration: Topology), there is 64 MB of L3 cache available to each processor. Therefore, each cache way represents approximately 3.37 MB of L3 cache (64 / 19 =~ 3.37).- Step 3 - Determine how much L3 cache to allocate to the host:
Any cache not allocated to the host will be reserved for real-time VMs. In this example, it was decided that 8 MB of L3 cache per processor was enough for the host, leaving 56 MB of L3 cache per processor for real-time VMs.
- Step 4 - Determine how many cache ways are needed to hold the desired amount of cache for the host:
Since each cache way is 3.37 MB, 3 cache ways are required to hold 8 MB (8 / 3.37 = 2.37). Since there cannot be fractional cache ways, 2.37 is rounded up, yielding 3.
- Step 5 - Determine what bitmask is needed to allocate the desired amount of L3 cache to the host:
Since cache allocation requires a contiguous region of cache ways, allocating 8 MB of L3 cache to the host (3 cache ways) will require a bitmask value of
0x3(Binary:0111).- Step 6 - Allocate the desired L3 cache to the host:
In this example, 8 MB of L3 cache per processor will be allocated to the host. The bitmask needed to allocate at least 8 MB of L3 cache is
0x3. To allocate 8 MB of L3 cache on processor0and1to the host, execute the following command:$ sudo bash -c 'echo "L3:0=0x0003;1=0x0003" > /sys/fs/resctrl/schemata'
See also
For more information on Resource Control
resctrl, see: intel/intel-cmt-cat
Open the VM configuration for editing:
$ sudo -E virsh edit "${DISTRO}-rt"
Determine how many CPUs the real-time VM should have. It is good practice to allocate at least 2 CPUs for each real-time VM. One vCPU will be used for non-real-time (housekeeping) processes, while the remaining vCPUs will be isolated in the VM and reserved for real-time applications.
In this example, the real-time VM is allocated 8 vCPUs:
<vcpu placement='static'>8</vcpu>
Determine how the real-time VM vCPUs should be affinitized to the host CPUs. There are a few objectives to keep in mind:
Make sure the host CPUs associated with the real-time VM are not in use by other VMs or the emulator.
Make sure the host CPUs associated with the real-time VM are isolated (refer to Host Configuration: Linux Kernel).
Make sure the vCPUs are affinitized to host CPUs on the same NUMA node (refer to Host Configuration: Topology).
In this example, the real-time VM’s 8 vCPUs are affinitized to isolated host CPUs
4,6,8,10,12,14,16,18on NUMA node 0. Add the<cputune>group after the<vcpu>group:<cputune> <vcpupin vcpu='0' cpuset='4'/> <vcpupin vcpu='1' cpuset='6'/> <vcpupin vcpu='2' cpuset='8'/> <vcpupin vcpu='3' cpuset='10'/> <vcpupin vcpu='4' cpuset='12'/> <vcpupin vcpu='5' cpuset='14'/> <vcpupin vcpu='6' cpuset='16'/> <vcpupin vcpu='7' cpuset='18'/> </cputune>
Determine how the emulator should be affinitized to the host CPUs. There are a few objectives to keep in mind:
Make sure the host CPUs associated with the emulator are not in use by other VMs.
Make sure the host CPUs associated with the emulator are isolated (refer to Host Configuration: Linux Kernel).
Make sure the host CPUs associated with the emulator are on the same NUMA node (refer to Host Configuration: Topology).
Make sure there are enough CPUs available to the emulator to prevent performance bottlenecks.
Note
Is is possible to use the same emulator CPUs across all VMs. Testing should always be conducted to verify a configuration per use case.
In this example, the emulator is affinitized to 4 CPUs
56,58,60,62on NUMA node 0. Add the<emulatorpin>group into the<cputune>group:<cputune> <vcpupin vcpu='0' cpuset='4'/> <vcpupin vcpu='1' cpuset='6'/> <vcpupin vcpu='2' cpuset='8'/> <vcpupin vcpu='3' cpuset='10'/> <vcpupin vcpu='4' cpuset='12'/> <vcpupin vcpu='5' cpuset='14'/> <vcpupin vcpu='6' cpuset='16'/> <vcpupin vcpu='7' cpuset='18'/> <emulatorpin cpuset='56,58,60,62'/> </cputune>
Determine the scheduler and priority used for the real-time VM vCPUs. Keep in mind, the real-time VM must necessarily execute housekeeping processes alongside any real-time application. If there is more than one vCPU assigned to the VM, it is recommended to make vCPU
0a lower priority1for housekeeping processes, and assign a higher priority10to the remaining vCPUs for real-time applications.In this example, the real-time VM’s 8 vCPUs are configured to use first-in-first-out
fifoscheduling, and vCPU0is assigned a lower priority (1) than the remaining vCPUs1-7which get a higher priority (10). Add the<vcpusched>lines into the<cputune>group:<cputune> <vcpupin vcpu='0' cpuset='4'/> <vcpupin vcpu='1' cpuset='6'/> <vcpupin vcpu='2' cpuset='8'/> <vcpupin vcpu='3' cpuset='10'/> <vcpupin vcpu='4' cpuset='12'/> <vcpupin vcpu='5' cpuset='14'/> <vcpupin vcpu='6' cpuset='16'/> <vcpupin vcpu='7' cpuset='18'/> <emulatorpin cpuset='56,58,60,62'/> <vcpusched vcpus='0' scheduler='fifo' priority='1'/> <vcpusched vcpus='1' scheduler='fifo' priority='10'/> <vcpusched vcpus='2' scheduler='fifo' priority='10'/> <vcpusched vcpus='3' scheduler='fifo' priority='10'/> <vcpusched vcpus='4' scheduler='fifo' priority='10'/> <vcpusched vcpus='5' scheduler='fifo' priority='10'/> <vcpusched vcpus='6' scheduler='fifo' priority='10'/> <vcpusched vcpus='7' scheduler='fifo' priority='10'/> </cputune>
Determine how much L3 CPU cache to allocate to the real-time VM.
Attention
Verify that your processor supports Intel® Cache Allocation Technology by checking the “Processor Support List” in Intel® Resource Director Technology (Intel® RDT) Architecture Specification.
If your processor does not support Intel® Cache Allocation Technology, then skip this step.
There are a few objectives to keep in mind:
Cache allocations must use a contiguous region of cache ways and the region must be large enough to satisfy the cache demand.
Cache allocations cannot reuse cache ways claimed by existing cache allocations.
Cache allocations should only be made on the same processor associated with the real-time VM vCPUs.
Cache allocations should be considerate of other workloads, including VMs, emulator, and the host, to minimize cache starvation.
In this example, 8 MB of L3 cache from processor
0(id='0') was allocated to the high priority vCPUs1-7. Add the<cachetune>group into the<cputune>group:<cputune> <vcpupin vcpu='0' cpuset='4'/> <vcpupin vcpu='1' cpuset='6'/> <vcpupin vcpu='2' cpuset='8'/> <vcpupin vcpu='3' cpuset='10'/> <vcpupin vcpu='4' cpuset='12'/> <vcpupin vcpu='5' cpuset='14'/> <vcpupin vcpu='6' cpuset='16'/> <vcpupin vcpu='7' cpuset='18'/> <emulatorpin cpuset='56,58,60,62'/> <vcpusched vcpus='0' scheduler='fifo' priority='1'/> <vcpusched vcpus='1' scheduler='fifo' priority='10'/> <vcpusched vcpus='2' scheduler='fifo' priority='10'/> <vcpusched vcpus='3' scheduler='fifo' priority='10'/> <vcpusched vcpus='4' scheduler='fifo' priority='10'/> <vcpusched vcpus='5' scheduler='fifo' priority='10'/> <vcpusched vcpus='6' scheduler='fifo' priority='10'/> <vcpusched vcpus='7' scheduler='fifo' priority='10'/> <cachetune vcpus='1-7' id='vcpus_1-7'> <cache id='0' level='3' type='both' size='8' unit='MiB'/> </cachetune> </cputune>
Configure the real-time VM CPU model to pass through the host model unchanged, with topology matching the placement. Remove the existing
<cpu>group, and add the<cpu>group after the<cputune>group. Make sure to modify the value assigned tocores=to match the number of vCPU assigned to the real-time VM:<cpu mode='host-passthrough' check='none' migratable='off'> <topology sockets='1' dies='1' cores='8' threads='1'/> <feature policy='require' name='tsc-deadline'/> </cpu>
Configure the real-time VM memory backing so that memory allocation is locked into RAM and page sharing is disabled. Add the
<memoryBacking>group after the<currentMemory>group:<memoryBacking> <nosharepages/> <locked/> </memoryBacking>
Configure the real-time VM to disable performance monitoring unit virtualization. Add the
<pmu>group into the<features>group:<features> ... <pmu state='off'/> </features>
Configure the real-time VM to disable memory ballooning to prevent unused memory assigned to the real-time VM from being released to the host. Remove any existing
<memballoon>group and add the following<memballoon>group into the<devices>group:<devices> ... <memballoon model='none'/> <devices/>
Optionally, configure the real-time VM to disable USB controllers if they are not in use. Remove all USB controllers that may exist in the XML config and replace them with:
<controller type="usb" model="none"/>
Save the real-time VM configuration and exit the editor.
A complete real-time VM configuration XML file is provided below for reference. Use this to cross-check your configuration:
Click to view the real-time VM configuration XML
<domain type='kvm' id='1'> <name>debian12</name> <uuid>425811b3-af98-49c4-9cc6-b79469151a24</uuid> <metadata> <libosinfo:libosinfo xmlns:libosinfo="http://libosinfo.org/xmlns/libvirt/domain/1.0"> <libosinfo:os id="http://debian.org/debian/12"/> </libosinfo:libosinfo> </metadata> <memory unit='KiB'>8388608</memory> <currentMemory unit='KiB'>8388608</currentMemory> <memoryBacking> <nosharepages/> <locked/> </memoryBacking> <vcpu placement='static'>8</vcpu> <cputune> <vcpupin vcpu='0' cpuset='4'/> <vcpupin vcpu='1' cpuset='6'/> <vcpupin vcpu='2' cpuset='8'/> <vcpupin vcpu='3' cpuset='10'/> <vcpupin vcpu='4' cpuset='12'/> <vcpupin vcpu='5' cpuset='14'/> <vcpupin vcpu='6' cpuset='16'/> <vcpupin vcpu='7' cpuset='18'/> <emulatorpin cpuset='56,58,60,62'/> <vcpusched vcpus='0' scheduler='fifo' priority='1'/> <vcpusched vcpus='1' scheduler='fifo' priority='10'/> <vcpusched vcpus='2' scheduler='fifo' priority='10'/> <vcpusched vcpus='3' scheduler='fifo' priority='10'/> <vcpusched vcpus='4' scheduler='fifo' priority='10'/> <vcpusched vcpus='5' scheduler='fifo' priority='10'/> <vcpusched vcpus='6' scheduler='fifo' priority='10'/> <vcpusched vcpus='7' scheduler='fifo' priority='10'/> <cachetune vcpus='1-7' id='vcpus_1-7'> <cache id='0' level='3' type='both' size='8' unit='MiB'/> </cachetune> <memorytune vcpus='1-7' id='vcpus_1-7'> <node id='0' bandwidth='100'/> <node id='1' bandwidth='100'/> </memorytune> </cputune> <resource> <partition>/machine</partition> </resource> <os> <type arch='x86_64' machine='pc-q35-8.2'>hvm</type> <boot dev='hd'/> </os> <features> <acpi/> <apic/> <pmu state='off'/> <vmport state='off'/> </features> <cpu mode='host-passthrough' check='none' migratable='off'> <topology sockets='1' dies='1' cores='8' threads='1'/> <feature policy='require' name='tsc-deadline'/> </cpu> <clock offset='utc'> <timer name='rtc' tickpolicy='catchup'/> <timer name='pit' tickpolicy='delay'/> <timer name='hpet' present='no'/> </clock> <on_poweroff>destroy</on_poweroff> <on_reboot>restart</on_reboot> <on_crash>destroy</on_crash> <pm> <suspend-to-mem enabled='no'/> <suspend-to-disk enabled='no'/> </pm> <devices> <emulator>/usr/bin/qemu-system-x86_64</emulator> <disk type='file' device='disk'> <driver name='qemu' type='qcow2' discard='unmap'/> <source file='/var/lib/libvirt/images/debian12-rt.qcow2' index='1'/> <backingStore/> <target dev='vda' bus='virtio'/> <alias name='virtio-disk0'/> <address type='pci' domain='0x0000' bus='0x04' slot='0x00' function='0x0'/> </disk> <controller type='usb' index='0' model='none'> <alias name='usb'/> </controller> <controller type='pci' index='0' model='pcie-root'> <alias name='pcie.0'/> </controller> <controller type='pci' index='1' model='pcie-root-port'> <model name='pcie-root-port'/> <target chassis='1' port='0x10'/> <alias name='pci.1'/> <address type='pci' domain='0x0000' bus='0x00' slot='0x02' function='0x0' multifunction='on'/> </controller> <controller type='pci' index='2' model='pcie-root-port'> <model name='pcie-root-port'/> <target chassis='2' port='0x8'/> <alias name='pci.2'/> <address type='pci' domain='0x0000' bus='0x00' slot='0x01' function='0x0' multifunction='on'/> </controller> <controller type='pci' index='3' model='pcie-root-port'> <model name='pcie-root-port'/> <target chassis='3' port='0x9'/> <alias name='pci.3'/> <address type='pci' domain='0x0000' bus='0x00' slot='0x01' function='0x1'/> </controller> <controller type='pci' index='4' model='pcie-root-port'> <model name='pcie-root-port'/> <target chassis='4' port='0xa'/> <alias name='pci.4'/> <address type='pci' domain='0x0000' bus='0x00' slot='0x01' function='0x2'/> </controller> <controller type='sata' index='0'> <alias name='ide'/> <address type='pci' domain='0x0000' bus='0x00' slot='0x1f' function='0x2'/> </controller> <controller type='virtio-serial' index='0'> <alias name='virtio-serial0'/> <address type='pci' domain='0x0000' bus='0x02' slot='0x00' function='0x0'/> </controller> <interface type='network'> <mac address='52:54:00:60:58:c3'/> <source network='default' portid='a0ae23fc-18f8-46aa-9358-c527ee41cf78' bridge='virbr0'/> <target dev='vnet14'/> <model type='virtio'/> <alias name='net0'/> <address type='pci' domain='0x0000' bus='0x01' slot='0x00' function='0x0'/> </interface> <serial type='pty'> <source path='/dev/pts/8'/> <target type='isa-serial' port='0'> <model name='isa-serial'/> </target> <alias name='serial0'/> </serial> <console type='pty' tty='/dev/pts/8'> <source path='/dev/pts/8'/> <target type='serial' port='0'/> <alias name='serial0'/> </console> <channel type='unix'> <source mode='bind' path='/run/libvirt/qemu/channel/15-debian12-rt/org.qemu.guest_agent.0'/> <target type='virtio' name='org.qemu.guest_agent.0' state='connected'/> <alias name='channel0'/> <address type='virtio-serial' controller='0' bus='0' port='1'/> </channel> <input type='mouse' bus='ps2'> <alias name='input0'/> </input> <input type='keyboard' bus='ps2'> <alias name='input1'/> </input> <audio id='1' type='none'/> <watchdog model='itco' action='reset'> <alias name='watchdog0'/> </watchdog> <memballoon model='none'/> </devices> <seclabel type='dynamic' model='dac' relabel='yes'> <label>+64055:+994</label> <imagelabel>+64055:+994</imagelabel> </seclabel> </domain>
Launch Real-Time VM#
In this section, the real-time VM will be launched, configured to use a real-time Linux kernel and isolated CPUs, and verified.
Before starting the real-time VM, it is necessary to ensure that the Intel® Cache Allocation Technology virtual file system is mounted and configured. This should already be completed at this stage, so verify that the configuration is correct:
Attention
Verify that your processor supports Intel® Cache Allocation Technology by checking the “Processor Support List” in Intel® Resource Director Technology (Intel® RDT) Architecture Specification.
If your processor does not support Intel® Cache Allocation Technology, then skip this step.
$ cat /sys/fs/resctrl/schemata
The output should contain a line with
L3::L3:0=0003;1=0003In this example, 8 MB of L3 cache per processor will be allocated to the host.
If you do not see the expected output, refer to Real-Time VM Configuration to setup the cache allocation.
Start the real-time VM using
virsh:$ sudo -E virsh start "${DISTRO}-rt"
Note
This section assumes that the
TYPEvariable was set tortwhen creating the real-time VM. Adjust as necessary.If you receive an error
error: unsupported configuration: Cache allocation of size 8388608 is not divisible by granularity #######, edit the real-time VM configuration and change the allocated cache to be a multiple of the granularity. For example, if the granularity is6815744, change the allocated cache to be a multiple such as6815744or13631488:<cache id='0' level='3' type='both' size='6815744' unit='B'/>
Verify that the real-time VM is running:
$ sudo virsh list
There should be a VM running with the same base name defined by the
DISTROvariable:Id Name State --------------------------------- 1 debian12-rt running
Start a console session to the real-time VM and login:
$ sudo -E virsh console "${DISTRO}-rt"
Tip
You may need to press the Enter key to get the login prompt to appear. The username should be
debianorubuntufor Debian or Canonical® Ubuntu® images respectively.The default key-binding to detach from the VM console is Ctrl + ].
Real-Time VM Configuration: APT Repository#
Setup the ECI APT repository:
Download the ECI APT key to the system keyring:
$ sudo -E wget -O- https://eci.intel.com/repos/gpg-keys/GPG-PUB-KEY-INTEL-ECI.gpg | sudo tee /usr/share/keyrings/eci-archive-keyring.gpg > /dev/null
Add the signed entry to APT sources and configure the APT client to use the ECI APT repository:
$ echo "deb [signed-by=/usr/share/keyrings/eci-archive-keyring.gpg] https://eci.intel.com/repos/$(source /etc/os-release && echo $VERSION_CODENAME) isar main" | sudo tee /etc/apt/sources.list.d/eci.list $ echo "deb-src [signed-by=/usr/share/keyrings/eci-archive-keyring.gpg] https://eci.intel.com/repos/$(source /etc/os-release && echo $VERSION_CODENAME) isar main" | sudo tee -a /etc/apt/sources.list.d/eci.list
Configure the ECI APT repository to have higher priority over other repositories:
$ sudo bash -c 'echo -e "Package: *\nPin: origin eci.intel.com\nPin-Priority: 1000" > /etc/apt/preferences.d/isar'
Update the APT sources lists:
$ sudo apt update
Tip
If the APT package manager is unable to connect to the repositories, follow these APT troubleshooting tips:
Make sure that the system has network connectivity.
Make sure that the ports
80and8080are not blocked by a firewall.Configure an APT proxy (if network traffic routes through a proxy server). To configure an APT proxy, add the following lines to a file at
/etc/apt/apt.conf.d/proxy.conf(replace the placeholders as per your specific user and proxy server):Acquire::http::Proxy "http://user:password@proxy.server:port/"; Acquire::https::Proxy "http://user:password@proxy.server:port/";
Real-Time VM Configuration: Dependencies#
Run the following command to install the dependencies needed to verify and benchmark the real-time VM:
$ sudo apt install wget stress-ng rt-tests-scripts
Real-Time VM Configuration: Linux Kernel#
Install the real-time Linux kernel and GRUB customizations into the real-time VM:
$ sudo apt install -y eci-customizations $ sudo apt install -y linux-intel-rt
Modify the GRUB configuration to isolate all the CPUs available on the real-time VM except for CPU 0.
In this example, CPUs
1-7will be isolated. Adjust the CPUs assigned to theISOLCPUSvariable in the command below per your specific real-time VM configuration:$ export ISOLCPUS="1-7" $ sudo -E sed -i "/^echo \"set eci_cmdline/iisolcpus=${ISOLCPUS}" /etc/grub.d/09_eci
Update the GRUB configuration and reboot the real-time VM:
$ sudo update-grub $ sudo reboot
Let the real-time VM fully boot, then login and verify that the Linux boot parameters are as expected:
Tip
If the real-time VM console exits, you may need to start the real-time VM again:
$ sudo -E virsh start "${DISTRO}-rt"
$ cat /proc/cmdline
The output should be similar to the following:
BOOT_IMAGE=/boot/vmlinuz-6.1.80-rt26-intel-ese-standard-lts-rt root=UUID=51aedac4-bf3b-46ee-a6e0-697f44327857 ro debug=all nosplash console=ttyS0,115200 console=tty0 clocksource=tsc tsc=reliable art=virtallow no_ipi_broadcast=1 nosoftlockup efi=runtime numa_balancing=disable hugepages=1024 audit=0 nmi_watchdog=0 irqaffinity=0 mce=off hpet=disable rcupdate.rcu_cpu_stall_suppress=1 rcu_nocb_poll noht isolcpus=1-7 rcu_nocbs=1-7 nohz_full=1-7 intel_pstate=disable intel.max_cstate=0 intel_idle.max_cstate=0 processor.max_cstate=0 processor_idle.max_cstate=0 i915.force_probe=* i915.enable_rc6=0 i915.enable_dc=0 i915.disable_power_well=0 igb.blacklist=no
Verify Real-Time VM Configuration#
Start a CPU stressor on the real-time VM using vCPU
0:$ sudo taskset -c 0 stress-ng --cpu 1
On the host, use a tool such as
htopto locate a heavily utilized CPU and verify that it is the expected CPU which vCPU0is affinitized to. In this example, the real-time VM vCPU0is affinitized to the host CPU4, which matches expectations:
Stop the CPU stressor in the real-time VM by pressing Ctrl + C.
Detach from the real-time VM console by pressing Ctrl + ].
Benchmarking Real-Time VM#
In this section, a stressor VM will be created which will be used to generate noise in an attempt to affect the real-time VM benchmark. Simultaneously, a cyclictest benchmark will be executed on the real-time VM.
Stressor VM Image Creation#
Follow the same steps from Real-Time VM Configuration, with the exception of exporting the
TYPEvariable to bestress:$ export TYPE="stress"
After completing Real-Time VM Configuration and starting the new VM, verify that the new VM is running:
$ sudo virsh list
There should be a new VMs running with the same base name defined by the
DISTROandTYPEvariables:Id Name State --------------------------------- 1 debian12-rt running 2 debian12-stress running
Stressor VM Configuration#
In this section, the stressor VM will be configured to map isolated CPUs from the host to virtual CPUs in the VM.
Turn off the stressor VM so that its configuration can be modified:
$ sudo -E virsh destroy "${DISTRO}-stress"
Open the VM configuration for editing:
$ sudo -E virsh edit "${DISTRO}-stress"
Determine how the stressor VM vCPUs should be affinitized to the host CPUs. There are a few objectives to keep in mind:
Make sure the host CPUs associated with the stressor VM are not in use by real-time VMs.
Make sure the host CPUs associated with the stressor VM are isolated (refer to Host Configuration: Linux Kernel). This isolates the stressor VM from the host, which can help prevent performance bottlenecks.
Make sure the vCPUs are affinitized to host CPUs on the same NUMA node (refer to Host Configuration: Topology). Ideally, choose a NUMA node that is not used by any real-time VMs.
In this example, the stressor VM’s 8 vCPUs are affinitized to isolated host CPUs
5,7,9,11,13,15,17,19on NUMA node 1. Add the<cputune>group after the<vcpu>group:<cputune> <vcpupin vcpu='0' cpuset='5'/> <vcpupin vcpu='1' cpuset='7'/> <vcpupin vcpu='2' cpuset='9'/> <vcpupin vcpu='3' cpuset='11'/> <vcpupin vcpu='4' cpuset='13'/> <vcpupin vcpu='5' cpuset='15'/> <vcpupin vcpu='6' cpuset='17'/> <vcpupin vcpu='7' cpuset='19'/> </cputune>
Save the stressor VM configuration and exit the editor.
Start the stressor VM using
virsh:$ sudo -E virsh start "${DISTRO}-stress"
Verify that the stressor VM is running:
$ sudo virsh list
There should be two VMs running:
Id Name State --------------------------------- 1 debian12-rt running 2 debian12-stress running
Execute Stressor VM Workload#
Start a console session to the stressor VM and login:
$ sudo -E virsh console "${DISTRO}-stress"
Tip
You may need to press the Enter key to get the login prompt to appear. The username should be
debianorubuntufor Debian or Canonical® Ubuntu® images respectively.Note
This section assumes that the
TYPEvariable was set tostresswhen creating the stressor VM. Adjust as necessary.Start a workload on the stressor VM. In this example, the Linux kernel will be repeatedly compiled as a workload:
$ sudo apt-get update
$ sudo apt-get install -y wget build-essential make flex bison bc libelf-dev libssl-dev
$ wget https://cdn.kernel.org/pub/linux/kernel/v6.x/linux-6.7.tar.xz
$ tar -xf linux-6.7.tar.xz
$ cd linux-6.7
$ make x86_64_defconfig
$ while true; do make -j16; make clean; done
Detach from the stressor VM console by pressing Ctrl + ].
Execute Real-Time VM Benchmark#
Start a console session to the real-time VM and login:
$ sudo -E virsh console "${DISTRO}-rt"
Note
This section assumes that the
TYPEvariable was set tortwhen creating the real-time VM. Adjust as necessary.Start the
cyclictestbenchmark:$ time sudo cyclictest --threads -t 4 -p 99 -i 1000 -d 1 -m --mainaffinity=1 -a 2-5
In this example, the
cyclictestbenchmark is configured to execute a single thread on each of the isolated CPUs2-5, the main thread to execute on the isolated core1, and the benchmark will execute for 24 hours before ending.
Expected Real-Time VM Results#
Wait 24 hours for the
cyclictestbenchmark to complete.After the benchmark completes, capture the results which are printed to the console. There should be one line per each CPU the benchmark was executing on.
In this example, the maximum latency observed was 290us:
T: 0 ( 1326) P:99 I:1000 C:86399992 Min:      6 Act:    9 Avg:    9 Max:     227
T: 1 ( 1327) P:99 I:1001 C:86313678 Min:      6 Act:   10 Avg:    9 Max:     258
T: 2 ( 1328) P:99 I:1002 C:86227537 Min:      6 Act:    9 Avg:    9 Max:     290
T: 3 ( 1329) P:99 I:1003 C:86141567 Min:      6 Act:   11 Avg:    9 Max:     201

real    1440m3.109s
user    0m21.848s
sys     1m35.480s
Results can vary between systems. Values less than 300us are good, and values less than 100us are great for virtualized environments. For reference,
cyclictestcan achieve less than 50us on bare-metal.