Tutorials#
These tutorials demonstrate how to use the docker containers installed.
Tutorial 1: OpenVINO Model Benchmark
Tutorial 2: Video Decode and Tiled Display
Tutorial 3: Object Detection using YOLOv8
Tutorial 4: Intel® Deep Learning Streamer (Intel® DL Streamer) Quick Start Container
Tutorial 1: OpenVINO Model Benchmark#
The following tutorial shows how to download a model, convert the OpenVINO model, and run a benchmark using the eef-metro1.5/metro-sdk:1.5 container.
Time to Complete#
5 ~ 10 minutes
Learning Objectives#
By the end of this tutorial, you will be able to use OpenVINO benchmark_app to run AI reference on different devices.
Prerequisites#
Metro AI Suite Software Development Kit package is installed.
Step 1: Create Dockerfile and add the following code. We are using yolov8n model for this benchmark.#
FROM eef-metro1.5/metro-sdk:1.5
ARG https_proxy
ARG http_proxy
ARG no_proxy

USER root
ENV HOME=/home/metro
RUN mkdir -p $HOME/share/models/

RUN curl -L -o bottle-detection.mp4 https://storage.openvinotoolkit.org/test_data/videos/bottle-detection.mp4

RUN pip install ultralytics==8.3.50
RUN yolo export model=yolov8n.pt format=openvino

WORKDIR /opt/intel/openvino/samples/cpp/
RUN ./build_samples.sh

USER metro
WORKDIR /home/metro
Step 2: Run the following docker command to build container:#
CONTAINER_NAME=openvino_benchmark_app
CONTAINER_TAG=1.5
docker build \
    --build-arg https_proxy="$https_proxy" \
    --build-arg http_proxy="$http_proxy" \
    --build-arg no_proxy="$no_proxy" \
    -t ${CONTAINER_NAME}:${CONTAINER_TAG} .
Step 3: Run the following docker command to run the container:#
docker run -it --rm \
--device /dev/dri \
--group-add=$(stat -c "%g" /dev/dri/render* | head -n 1) \
--volume /tmp/.X11-unix:/tmp/.X11-unix:ro \
--volume ${HOME}/.Xauthority:/home/metro/.Xauthority:ro \
--volume ${PWD}/test_data:/home/metro/test_data \
--env DISPLAY=:0 \
--env XDG_RUNTIME_DIR=${XDG_RUNTIME_DIR} \
--env http_proxy=$http_proxy \
--env https_proxy=$https_proxy \
--env no_proxy=$no_proxy \
openvino_benchmark_app:1.5 \
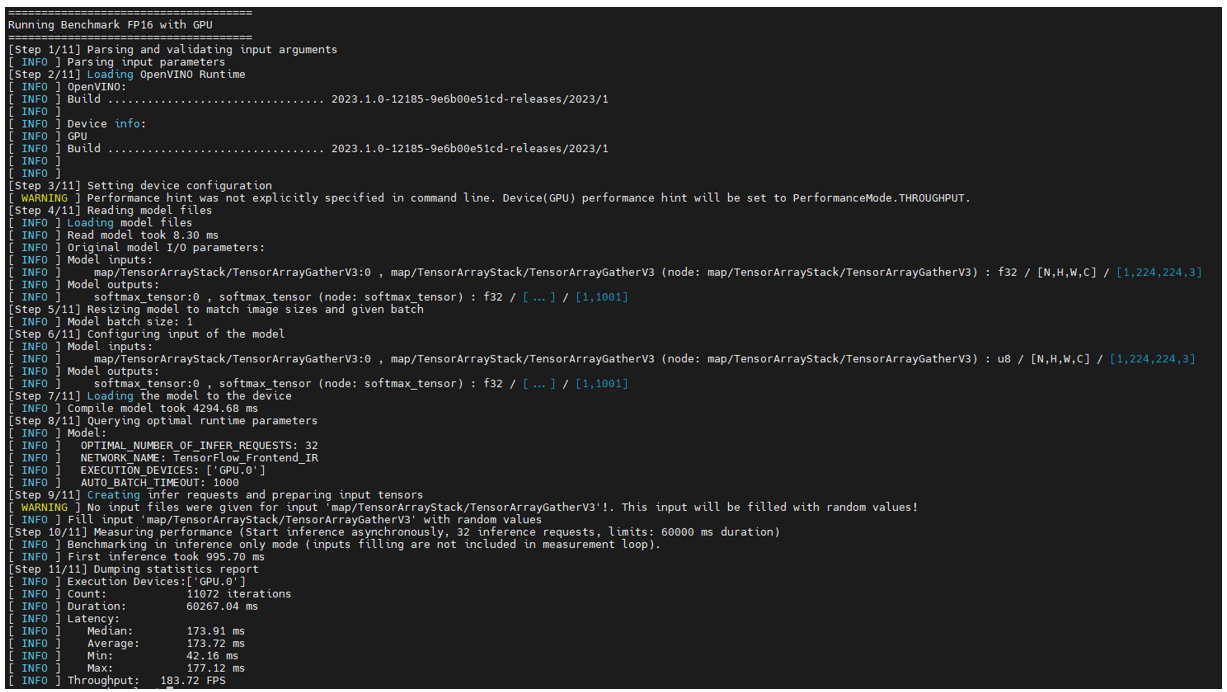
/home/metro/openvino_cpp_samples_build/intel64/Release/benchmark_app -m yolov8n_openvino_model/yolov8n.xml -i bottle-detection.mp4 -d GPU
Note: Add
--device=/dev/accelif you are running in Intel® Core™ Ultra Processors
Here is the result:
Tutorial 2: Video Decode and Tiled Display#
The following tutorial shows the use of the eef-metro1.5/metro-sdk:1.5 container for streaming and media processing. This tutorial decodes 16 video files using VAAPI and composes them for display on a 4K resolution (3840x2160) monitor.
Note: This sample is not supported on Intel® Xeon® platform, please use Intel® Core™ or Intel® Core™ Ultra platform to run it.
Time to Complete#
5 ~ 10 minutes
Learning Objectives#
By the end of this tutorial, you will be able to run video decode display with multiple windows on Metro AI Suite device.
Prerequisites#
Metro AI Suite Software Development Kit package is installed.
Step 1: Download Big_Buck_Bunny.mp4 video file from https://vimeo.com/644498079 and save it in Videos directory in the same directory.#
Step 2: Create decode.sh script file#
run
vi decode.shcommand
vi decode.sh
add below content in
decode.sh
#!/bin/bash
VIDEO_IN=Videos/Big_Buck_Bunny.mp4
gst-launch-1.0 vacompositor name=comp0 sink_1::xpos=0 sink_1::ypos=0 sink_1::alpha=1 sink_2::xpos=960 sink_2::ypos=0 sink_2::alpha=1 sink_3::xpos=1920 sink_3::ypos=0 sink_3::alpha=1 sink_4::xpos=2880 sink_4::ypos=0 sink_4::alpha=1 sink_5::xpos=0 sink_5::ypos=540 sink_5::alpha=1 sink_6::xpos=960 sink_6::ypos=540 sink_6::alpha=1 sink_7::xpos=1920 sink_7::ypos=540 sink_7::alpha=1 sink_8::xpos=2880 sink_8::ypos=540 sink_8::alpha=1 sink_9::xpos=0 sink_9::ypos=1080 sink_9::alpha=1 sink_10::xpos=960 sink_10::ypos=1080 sink_10::alpha=1 sink_11::xpos=1920 sink_11::ypos=1080 sink_11::alpha=1 sink_12::xpos=2880 sink_12::ypos=1080 sink_12::alpha=1 sink_13::xpos=0 sink_13::ypos=1620 sink_13::alpha=1 sink_14::xpos=960 sink_14::ypos=1620 sink_14::alpha=1 sink_15::xpos=1920 sink_15::ypos=1620 sink_15::alpha=1 sink_16::xpos=2880 sink_16::ypos=1620 sink_16::alpha=1 ! vapostproc ! xvimagesink display=:0 sync=false \
\
filesrc location=${VIDEO_IN} ! qtdemux ! vah264dec ! gvafpscounter ! vapostproc scale-method=fast ! video/x-raw,width=960,height=540 ! comp0.sink_1 \
filesrc location=${VIDEO_IN} ! qtdemux ! vah264dec ! gvafpscounter ! vapostproc scale-method=fast ! video/x-raw,width=960,height=540 ! comp0.sink_2 \
filesrc location=${VIDEO_IN} ! qtdemux ! vah264dec ! gvafpscounter ! vapostproc scale-method=fast ! video/x-raw,width=960,height=540 ! comp0.sink_3 \
filesrc location=${VIDEO_IN} ! qtdemux ! vah264dec ! gvafpscounter ! vapostproc scale-method=fast ! video/x-raw,width=960,height=540 ! comp0.sink_4 \
\
filesrc location=${VIDEO_IN} ! qtdemux ! vah264dec ! gvafpscounter ! vapostproc scale-method=fast ! video/x-raw,width=960,height=540 ! comp0.sink_5 \
filesrc location=${VIDEO_IN} ! qtdemux ! vah264dec ! gvafpscounter ! vapostproc scale-method=fast ! video/x-raw,width=960,height=540 ! comp0.sink_6 \
filesrc location=${VIDEO_IN} ! qtdemux ! vah264dec ! gvafpscounter ! vapostproc scale-method=fast ! video/x-raw,width=960,height=540 ! comp0.sink_7 \
filesrc location=${VIDEO_IN} ! qtdemux ! vah264dec ! gvafpscounter ! vapostproc scale-method=fast ! video/x-raw,width=960,height=540 ! comp0.sink_8 \
\
filesrc location=${VIDEO_IN} ! qtdemux ! vah264dec ! gvafpscounter ! vapostproc scale-method=fast ! video/x-raw,width=960,height=540 ! comp0.sink_9 \
filesrc location=${VIDEO_IN} ! qtdemux ! vah264dec ! gvafpscounter ! vapostproc scale-method=fast ! video/x-raw,width=960,height=540 ! comp0.sink_10 \
filesrc location=${VIDEO_IN} ! qtdemux ! vah264dec ! gvafpscounter ! vapostproc scale-method=fast ! video/x-raw,width=960,height=540 ! comp0.sink_11 \
filesrc location=${VIDEO_IN} ! qtdemux ! vah264dec ! gvafpscounter ! vapostproc scale-method=fast ! video/x-raw,width=960,height=540 ! comp0.sink_12 \
\
filesrc location=${VIDEO_IN} ! qtdemux ! vah264dec ! gvafpscounter ! vapostproc scale-method=fast ! video/x-raw,width=960,height=540 ! comp0.sink_13 \
filesrc location=${VIDEO_IN} ! qtdemux ! vah264dec ! gvafpscounter ! vapostproc scale-method=fast ! video/x-raw,width=960,height=540 ! comp0.sink_14 \
filesrc location=${VIDEO_IN} ! qtdemux ! vah264dec ! gvafpscounter ! vapostproc scale-method=fast ! video/x-raw,width=960,height=540 ! comp0.sink_15 \
filesrc location=${VIDEO_IN} ! qtdemux ! vah264dec ! gvafpscounter ! vapostproc scale-method=fast ! video/x-raw,width=960,height=540 ! comp0.sink_16
Step 3: Assign execute permission to the file and enable display from the docker image to localhost:#
   chmod 755 decode.sh
   xhost +
Step 4: Execute the decode script:#
   export DEVICE=/dev/dri/renderD128
   export DEVICE_GRP=$(ls -g $DEVICE | awk '{print $3}' | xargs getent group | awk -F: '{print $3}')
   docker run -it --rm --net=host \
     -e no_proxy=$no_proxy -e https_proxy=$https_proxy \
     -e socks_proxy=$socks_proxy -e http_proxy=$http_proxy \
     -v /tmp/.X11-unix \
     --device /dev/dri --group-add ${DEVICE_GRP} \
     -e DISPLAY=$DISPLAY \
     -v $HOME/.Xauthority:/home/metro//.Xauthority:ro \
     -v $PWD/Videos:/home/metro/Videos:ro \
     -v $PWD/decode.sh:/home/metro/decode.sh:ro \
     eef-metro1.5/metro-sdk:1.5 /home/metro/decode.sh
Here is the result:

Summary#
In this tutorial, you learned how to use the Metro AI Suite dlstreamer base container to run video decode gstreamer and tiled display pipeline.
Tutorial 3: Object Detection Using YOLOv8#
The following docker file is used to build the object detection in the Reference Implementation package. The file uses eef-metro1.5/metro-sdk:1.5 to download models from the OpenVINO model zoo and compile the demo.
Time to Complete#
10 ~ 15 minutes
Learning Objectives#
By the end of this tutorial, you will be able to run Object Detection Demo on your device.
Prerequisites#
Metro AI Suite Software Development Kit package is installed.
Step 1: Build sample docker container with Dockerfile#
Save below content as Dockerfile
FROM metro-sdk:1.5 AS builder
ARG https_proxy
ARG http_proxy
ARG no_proxy

ENV HOME=/home/metro
RUN mkdir -p $HOME/share/models/

RUN curl -L -o bottle-detection.mp4 https://storage.openvinotoolkit.org/test_data/videos/bottle-detection.mp4

RUN pip install ultralytics==8.3.50
RUN yolo export model=yolov8n.pt format=openvino

USER root
COPY inference.py /home/metro/inference.py
RUN chmod +x /home/metro/inference.py

USER metro
WORKDIR /home/metro

ENTRYPOINT ["python3", "/home/metro/inference.py"]
Save below content as inference.py
import cv2
import time
import numpy as np
from openvino.runtime import Core

def run_inference(device):
    # Load the OpenVINO model
    ie = Core()
    model_path = "yolov8n_openvino_model/yolov8n.xml"
    compiled_model = ie.compile_model(model_path, device)
    input_layer = compiled_model.input(0)
    output_layer = compiled_model.output(0)

    # Open the video file
    video_path = "bottle-detection.mp4"
    cap = cv2.VideoCapture(video_path)

    if not cap.isOpened():
        print(f"[ERROR] Unable to open video file for device: {device}.")
        return 0, 0

    frame_count = 0
    fps_list = []

    print(f"[INFO] Starting inference on {device}...")

    while True:
        # Read a frame from the video
        start_time = time.time()
        ret, frame = cap.read()
        input_reading_time = (time.time() - start_time) * 1000  # ms

        if not ret:
            break

        # Preprocess the frame
        start_time = time.time()
        resized_frame = cv2.resize(frame, (input_layer.shape[2], input_layer.shape[3]))
        input_blob = np.expand_dims(resized_frame.transpose(2, 0, 1), axis=0)
        preprocess_time = (time.time() - start_time) * 1000  # ms

        # Perform inference
        start_time = time.time()
        results = compiled_model([input_blob])[output_layer]
        inference_time = (time.time() - start_time) * 1000  # ms

        # Decode results (dummy decoding for this example)
        start_time = time.time()
        decoding_time = (time.time() - start_time) * 1000  # ms

        # Render results (dummy rendering for this example)
        start_time = time.time()
        rendering_time = (time.time() - start_time) * 1000  # ms

        # Calculate FPS
        total_frame_time = input_reading_time + preprocess_time + inference_time + decoding_time + rendering_time
        fps = 1000 / total_frame_time if total_frame_time > 0 else 0
        fps_list.append(fps)

        frame_count += 1

    # Calculate average FPS
    average_fps = sum(fps_list) / len(fps_list) if fps_list else 0
    cap.release()
    return frame_count, average_fps

# Run inference on CPU
cpu_frame_count, cpu_avg_fps = run_inference("CPU")
print(f"[INFO] Total frames processed on CPU: {cpu_frame_count}")
print(f"[INFO] Average FPS on CPU: {cpu_avg_fps:.2f}")

# Run inference on GPU (if available)
try:
    gpu_frame_count, gpu_avg_fps = run_inference("GPU")
    print(f"[INFO] Total frames processed on GPU: {gpu_frame_count}")
    print(f"[INFO] Average FPS on GPU: {gpu_avg_fps:.2f}")
except Exception as e:
    print(f"[WARNING] GPU inference failed: {e}")
Run
docker buildcommand
CONTAINER_NAME=object_detection
CONTAINER_TAG=1.5

docker build \
    --build-arg https_proxy="$https_proxy" \
    --build-arg http_proxy="$http_proxy" \
    --build-arg no_proxy="$no_proxy" \
    -t ${CONTAINER_NAME}:${CONTAINER_TAG} .
Execute following
docker runcommand to run the demo
docker run -it --rm \
   --device /dev/dri \
   --group-add=$(stat -c "%g" /dev/dri/render* | head -n 1) \
   --volume /tmp/.X11-unix:/tmp/.X11-unix:ro \
   --volume ${HOME}/.Xauthority:/home/metro/.Xauthority:ro \
   --volume ${PWD}/test_data:/home/metro/test_data \
   --env DISPLAY=:0 \
   --env XDG_RUNTIME_DIR=${XDG_RUNTIME_DIR} \
   --env http_proxy=$http_proxy \
   --env https_proxy=$https_proxy \
   --env no_proxy=$no_proxy \
   object_detection:1.5
Example output:
[INFO] Starting inference on CPU...
[INFO] Total frames processed on CPU: 1189
[INFO] Average FPS on CPU: 25.80
[INFO] Starting inference on GPU...
[INFO] Total frames processed on GPU: 1189
[INFO] Average FPS on GPU: 108.38
Summary#
In this tutorial, you learned how to use the Metro AI Suite base containers to create your own image and execute the image to run the demo.
Tutorial 4: Intel® Deep Learning Streamer (Intel® DL Streamer) Quick Start Container#
This tutorial demonstrates how you can quickly build a video analytics pipeline using Intel® DL Streamer quick-start container.
The quick-start container is a pre-validated environment to prototype and develop video analytic solutions using Intel® DL Streamer. You can find more information about Intel® DL Streamer at this location.
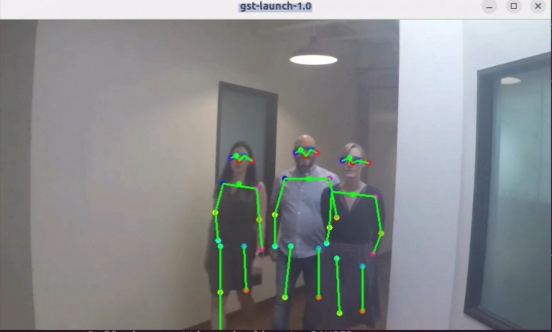
In this tutorial, we will walk through the steps to run Intel® DL Streamer’s human-pose-estimation sample using the quick-start container. We will also make some modifications to run video analytics on the platform’s GPU (/dev/dri/renderD128)
Step 1: Preparing to Run#
We will start by creating a
Dockerfilefor this project.touch DockerfileAdd the following with your favorite editor. We want to use the quick-start container as the base.
FROM eef-metro1.5/metro-sdk:1.5

ARG https_proxy
ARG http_proxy
ARG no_proxy
We download the human-pose-estimation sample from Intel® DL Streamer git repository and the model from OpenVINO™ model zoo. Since the quick-start container has OpenVINO™ development tools pre-installed,
omz_downloaderis readily available. The model requires post-processing to convert model tensor output to key points. This is done using a model-proc file. We download this from DLStreamer git repository as well.# Downloading Omx RUN pip install openvino-dev RUN pip install openvino-dev[onnx,pytorch,tensorflow] # Download the human_pose_estimation sample shell script from DLStreamer sample folder RUN wget -O human_pose_estimation.sh \ https://github.com/dlstreamer/dlstreamer/blob/v2024.2.1/samples/gstreamer/gst_launch/human_pose_estimation/human_pose_estimation.sh?raw=true # Download the human-pose-estimation model from OpenVINO Model Zoo ENV MODELS_PATH=/home/metro/models RUN omz_downloader -o ${MODELS_PATH} --name human-pose-estimation-0001 # Download the human-pose-estimation model processing JSON file from DLStramer sample folder RUN mkdir -p model_proc && wget -O model_proc/human-pose-estimation-0001.json \ https://github.com/dlstreamer/dlstreamer/blob/v2025.0.1/samples/gstreamer/gst_launch/human_pose_estimation/model_proc/human-pose-estimation-0001.json?raw=true
By default, the human-pose-estimation sample is targeted for CPU, here we update the sample to run inference on the GPU. We also want to ensure zero-copy between video decode and inference with the
va-surface-sharingflag.# Update script to use GPU by default RUN sed -i '17s#CPU#GPU#' human_pose_estimation.sh # Use GPU VAMemory GstBuffer to carry the decoded frames RUN sed -i '53s#\(decodebin\)#\1 ! vapostproc ! video/x-raw\(memory:VAMemory\)#' human_pose_estimation.sh # Ensure surface sharing between decode and inference stages RUN sed -i '54s#\(device=$DEVICE\)#\1 pre-process-backend=va-surface-sharing#' human_pose_estimation.sh RUN chmod +x human_pose_estimation.sh
Finally, we setup the container entry point
ENTRYPOINT [ "/bin/bash", "-c", "source /opt/intel/openvino/setupvars.sh && ./human_pose_estimation.sh" ]
Run following command to enable display from docker and build docker image:
xhost +
docker build -t dlstreamer-human-pose-estimation-sample \
   --build-arg http_proxy \
   --build-arg https_proxy \
   --build-arg no_proxy \
   -f Dockerfile .
Step 2: Run Container#
To run the sample, we need to grant the container access to GPU and local display.
export DEVICE=${DEVICE:-/dev/dri/renderD128}
export DEVICE_GRP=$(stat -c %g $DEVICE)
docker run --rm -ti --net=host \
       --device ${DEVICE} --group-add ${DEVICE_GRP} \
       -e DISPLAY=${DISPLAY} \
       -e XAUTHORITY=${XAUTHORITY} \
       -v ${XAUTHORITY}:${XAUTHORITY} \
       dlstreamer-human-pose-estimation-sample
Here is the sample output:
For more tutorials related to Edge Video Analytics Microservice, please refer to this Guide